Create lab infrastructure running Virtual machines with MAAS using Vagrant
Create lab infrastructure running Virtual machines with MAAS using Vagrant
Original post from linux.xvx.cz
Sometimes it’s handy to replicate the physical environment on a single server to do some testing.
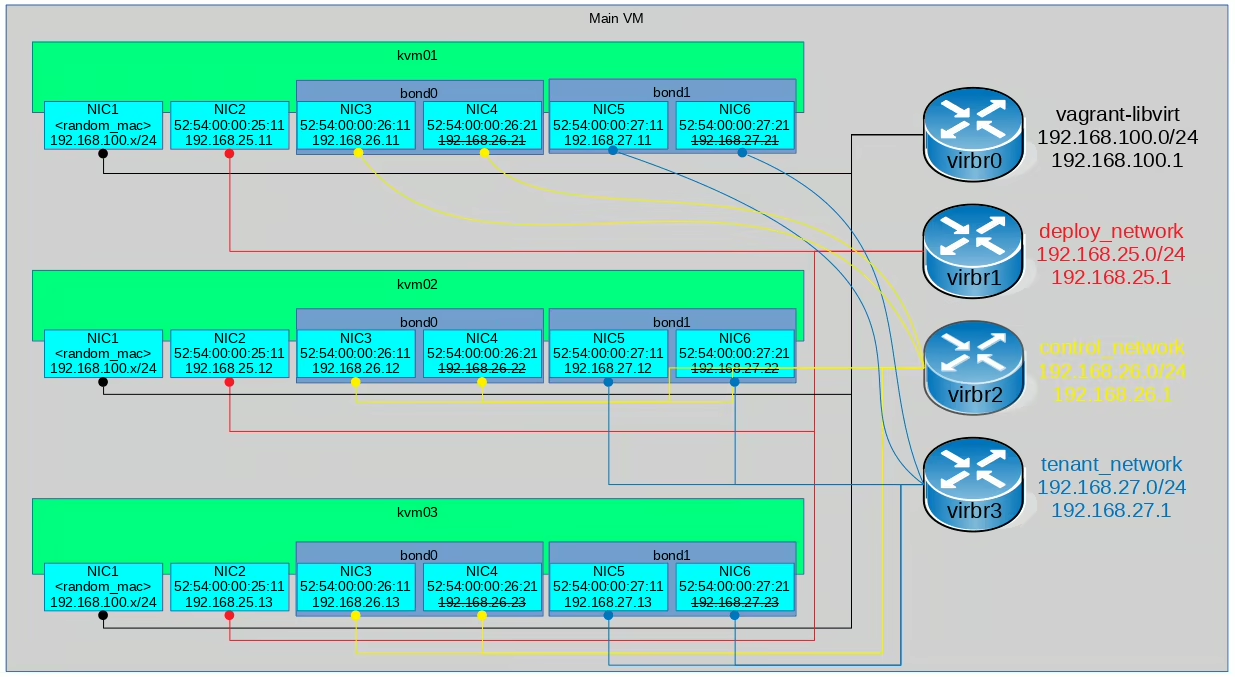
In my case I replicated the environment containing 3 VMs where MAAS was installed on the first VM (kvm01) and the other two VMs (kvm02, kvm03) were provisioned by MAAS. I also defined a few networks with IP ranges: deploy_network 192.168.25.0/24, control_network 192.168.26.0/24, tenant_network 192.168.27.0/24.
Here is the network diagram of the lab:
You can see the commands I used and descriptive video…
It’s better to see the video with lab description:
Here are the commands I used:
1
2
3
4
5
6
7
8
9
10
11
12
13
14
15
16
17
18
19
20
21
22
23
24
25
26
27
28
29
30
31
32
33
34
35
36
37
38
39
40
41
42
43
44
45
46
47
48
49
50
51
52
53
54
55
56
57
58
59
60
61
62
63
64
65
66
67
68
69
70
71
72
73
74
75
76
77
78
79
80
81
82
83
84
85
86
87
88
89
90
91
92
93
94
95
96
97
98
99
100
101
102
103
104
105
106
107
108
109
110
111
112
113
114
115
116
117
118
119
120
121
122
123
124
125
126
127
128
129
130
131
132
133
134
135
136
137
138
139
140
141
142
143
144
145
146
147
148
149
150
151
152
153
154
155
156
157
158
159
160
161
162
163
164
165
166
167
168
169
170
171
172
173
174
175
176
177
178
179
180
181
182
183
184
185
186
187
188
189
190
191
192
193
194
195
196
197
198
199
200
201
202
203
204
205
206
207
208
209
210
211
212
213
214
215
216
217
218
219
220
221
222
223
224
225
226
227
228
229
230
231
232
233
234
235
236
237
238
239
240
241
242
243
244
245
246
247
248
249
250
251
252
253
254
255
256
257
258
259
260
261
262
263
264
265
266
267
268
269
270
271
272
273
274
275
276
277
278
279
280
281
282
283
284
285
286
287
288
289
290
291
292
293
# Install Vagrant and virsh command
dnf install -y libvirt-client vagrant-hostmanager vagrant-libvirt

# Allow to manage VMs via libvirt remotely (using TCP connection)
cat >> /etc/libvirt/libvirtd.conf << EOF
listen_tls = 0
listen_tcp = 1
listen_addr = "0.0.0.0"
auth_tcp = "none"
EOF

echo 'LIBVIRTD_ARGS="--listen --config /etc/libvirt/libvirtd.conf"' >> /etc/sysconfig/libvirtd
service libvirtd restart

# Generate ssh key used for accessing the VMs
ssh-keygen -P "" -f /root/.ssh/id_rsa -C "admin@example.com"

# Check the VMs
VIRSH_VMS=$(virsh list | awk '/_kvm/ { print $2 }')
for VIRSH_VM in $VIRSH_VMS; do
  echo "*** $VIRSH_VM"
  virsh dumpxml "$VIRSH_VM" | grep 'mac address' | sort
done

# Check the subnets
virsh net-list --all | grep network
VIRSH_NETWORKS=$(virsh net-list | awk '/network|vagrant/ { print $1 }')
for VIRSH_NETWORK in $VIRSH_NETWORKS; do
  echo "*** $VIRSH_NETWORK"
  virsh net-dumpxml "$VIRSH_NETWORK"
done

# Create Vagrantfile
mkdir /var/tmp/test
cat > /var/tmp/test/Vagrantfile << \EOF

box_image = "peru/my_ubuntu-16.04-server-amd64"
node_count = 3
ssh_pub_key = File.readlines("#{Dir.home}/.ssh/id_rsa.pub").first.strip

Vagrant.configure(2) do |config|
  config.hostmanager.enabled = true
  config.hostmanager.manage_host = true
  config.hostmanager.manage_guest = false
  config.vm.synced_folder ".", "/vagrant", :disabled => true

  config.vm.provider :libvirt do |domain|
    domain.cpus = 2
    domain.cpu_mode = "host-passthrough"
    domain.memory = 1536
    domain.machine_virtual_size = 150
    domain.disk_bus = "virtio"
    domain.nic_model_type = "virtio"
    domain.video_type = "qxl"
    domain.graphics_type = "spice"
    domain.management_network_address = "192.168.100.0/24"
  end

  (1..node_count).each do |i|
    config.vm.define "kvm0#{i}" do |config|
      config.vm.hostname = "kvm0#{i}"
      config.hostmanager.ignore_private_ip = true

      if i == 1
        config.vm.box = box_image
        config.vm.network :forwarded_port, guest: 80, host: 80, host_ip: "*"
      end

      config.vm.provider :libvirt do |domain|
        domain.storage :file, :size => '100G', :type => 'qcow2'
        if i == 1
          domain.memory = 4096
        else
          boot_network = {'network' => 'deploy_network'}
          domain.boot boot_network
          #domain.loader = "/usr/share/edk2/ovmf/OVMF_CODE.fd"
        end
      end

      config.vm.network :private_network, ip: "192.168.25.#{i+10}", auto_config: false, libvirt__network_name: "deploy_network", libvirt__dhcp_enabled: false, libvirt__forward_mode: "nat", :mac => "52:54:00:00:25:#{i+10}"

      config.vm.network :private_network, ip: "192.168.26.#{i+10}", auto_config: false, libvirt__network_name: "control_network", libvirt__dhcp_enabled: false, libvirt__forward_mode: "nat", :mac => "52:54:00:00:26:#{i+10}"
      config.vm.network :private_network, ip: "192.168.26.#{i+20}", auto_config: false, libvirt__network_name: "control_network", libvirt__dhcp_enabled: false, libvirt__forward_mode: "nat", :mac => "52:54:00:00:26:#{i+20}"

      config.vm.network :private_network, ip: "192.168.27.#{i+10}", auto_config: false, libvirt__network_name: "tenant_network", libvirt__dhcp_enabled: false, libvirt__forward_mode: "nat", :mac => "52:54:00:00:27:#{i+10}"
      config.vm.network :private_network, ip: "192.168.27.#{i+20}", auto_config: false, libvirt__network_name: "tenant_network", libvirt__dhcp_enabled: false, libvirt__forward_mode: "nat", :mac => "52:54:00:00:27:#{i+20}"
    end
  end

  config.vm.provision 'shell', inline: "install -m 0700 -d /root/.ssh/; echo #{ssh_pub_key} >> /root/.ssh/authorized_keys; chmod 0600 /root/.ssh/authorized_keys"
  config.vm.provision 'shell', inline: "echo #{ssh_pub_key} >> /home/vagrant/.ssh/authorized_keys", privileged: false
end

# Deploy network subnet:  192.168.25.0/24, GW: 192.168.125.1
# Control network subnet: 192.168.26.0/24, GW: 192.168.126.1
# Tenant network subnet:  192.168.27.0/24, GW: 192.168.127.1
EOF

cd /var/tmp/test || exit
# Start all VMs + create networking
vagrant up kvm01
vagrant up

# Check the VMs - all should be running
VIRSH_VMS=$(virsh list | awk '/_kvm/ { print $2 }')
for VIRSH_VM in $VIRSH_VMS; do
  echo "*** $VIRSH_VM"
  virsh dumpxml "$VIRSH_VM" | grep 'mac address' | sort
done

# Check the subnets
virsh net-list --all | grep network
VIRSH_NETWORKS=$(virsh net-list | awk '/network|vagrant/ { print $1 }')
for VIRSH_NETWORK in $VIRSH_NETWORKS; do
  echo "*** $VIRSH_NETWORK"
  virsh net-dumpxml "$VIRSH_NETWORK"
done

# Check the DHCP lease file - there should be only kvm01
DEVICE=$(virsh net-dumpxml vagrant-libvirt | awk -F\' '/bridge/ { print $2 }')
cat "/var/lib/libvirt/dnsmasq/${DEVICE}.status"

# SSH to the first node where MAAS will be installed
ssh -o StrictHostKeyChecking=no kvm01

# Check IPs / NICS
ip a

# Configure the NICs
apt update
apt install -y ifenslave
cat >> /etc/network/interfaces << EOF
auto eth1
iface eth1 inet static
    address 192.168.25.11
    netmask 255.255.255.0

auto eth2
iface eth2 inet manual
    bond-master bond0

auto eth3
iface eth3 inet manual
    bond-master bond0

auto bond0
iface bond0 inet static
    address 192.168.26.11
    netmask 255.255.255.0
    bond-slaves eth2 eth3
    bond_mode active-backup

auto eth4
iface eth4 inet manual
    bond-master bond1

auto eth5
iface eth5 inet manual
    bond-master bond1

auto bond1
iface bond1 inet static
    address 192.168.27.11
    netmask 255.255.255.0
    bond-slaves eth4 eth5
    bond_mode active-backup
EOF
service networking restart

# Install MAAS
apt install -y jq libvirt-bin maas

# Configure Region controller to point to the right MAAS IP address
maas-region local_config_set --maas-url http://192.168.25.11:5240/MAAS
systemctl restart maas-regiond

# Register a rack controller with the MAAS
maas-rack register --url http://192.168.25.11:5240/MAAS --secret "$(cat /var/lib/maas/secret)"

# Create administrator (MAAS "superuser")
maas createadmin --username=admin --email=admin@example.com --password admin123

# Export API key that was generated when the MAAS account was created
maas-region apikey --username=admin > /root/api_key

# Create a short script which will help you to login to MAAS quickly
cat > /root/maas-login.sh << \EOF
#!/bin/sh

# Change these 3 values as required
PROFILE=admin
API_KEY_FILE=/root/api_key
API_SERVER=localhost

MAAS_URL=http://$API_SERVER/MAAS/api/2.0

maas login $PROFILE $MAAS_URL - < $API_KEY_FILE
EOF

chmod a+x /root/maas-login.sh
# Login to MAAS
/root/maas-login.sh

# Generate SSH key which will be imported in the next command
ssh-keygen -P "" -f /root/.ssh/id_rsa -C "admin@example.com"

# Import the admin SSH key
maas admin sshkeys create "key=$(cat /root/.ssh/id_rsa.pub)"

# Turn OFF all VMs except the first one running MAAS
# This will also test if the libvirtd daemon is properly configured allowing MAAS to manage the VMs
virsh -c qemu+tcp://192.168.25.1/system destroy test_kvm02
virsh -c qemu+tcp://192.168.25.1/system destroy test_kvm03
virsh -c qemu+tcp://192.168.25.1/system list --all

SUBNET_CIDR="192.168.25.0/24"
SUBNET_PREFIX=$(echo "$SUBNET_CIDR" | sed -r 's/(([0-9]{1,3}\.){2}.[0-9]{1,3}).*/\1/')
PRIMARY_RACK_CONTROLLER=$(maas admin rack-controllers read | jq -r '.[0].system_id')
VLAN_FABRIC_ID=$(maas admin subnet read "$SUBNET_CIDR" | jq '.vlan.fabric_id')
VLAN_VID=$(maas admin subnets read | jq -r ".[] |  select(.cidr==\"$SUBNET_CIDR\")".vlan.vid)

# Add default gateway for 192.168.25.0/24
maas admin subnet update "cidr:${SUBNET_CIDR}" "gateway_ip=${SUBNET_PREFIX}.1"

# Enable DHCP on the subnet 192.168.25.0/24 and reserve dynamic IP range (192.168.25.200 - 192.168.25.250) - used for commissioning
maas admin ipranges create type=dynamic "start_ip=${SUBNET_PREFIX}.200" "end_ip=${SUBNET_PREFIX}.250" comment='This is a reserved dynamic range'
maas admin vlan update "$VLAN_FABRIC_ID" "$VLAN_VID" dhcp_on=True "primary_rack=$PRIMARY_RACK_CONTROLLER"

# Define node by specifying the libvirt VM management and start commissioning
for INDEX in {2..3}; do
  MAC="52:54:00:00:25:1${INDEX}"
  maas admin machines create power_parameters_power_address=qemu+tcp://192.168.25.1/system "hostname=kvm0${INDEX}" power_type=virsh "power_parameters_power_id=test_kvm0${INDEX}" architecture=amd64/generic "mac_addresses=$MAC"
done

# All the machines should be in commissioning state right now
virsh -c qemu+tcp://192.168.25.1/system list --all

# Set static IPs, create bonds and deploy the Ubuntu Xenial
for INDEX in {2..3}; do
  MAC_1="52:54:00:00:25:1${INDEX}"
  MAC_2="52:54:00:00:26:1${INDEX}"
  MAC_3="52:54:00:00:26:2${INDEX}"
  MAC_4="52:54:00:00:27:1${INDEX}"
  MAC_5="52:54:00:00:27:2${INDEX}"
  IP_1="192.168.25.1${INDEX}"
  SUBNET_CIDR_1="192.168.25.0/24"
  IP_2="192.168.26.1${INDEX}"
  SUBNET_CIDR_2="192.168.26.0/24"
  IP_3="192.168.27.1${INDEX}"
  SUBNET_CIDR_3="192.168.27.0/24"

  maas admin nodes read "mac_address=$MAC_1" > /tmp/maas_nodes_read
  SYSTEM_ID=$(jq -r ".[].system_id" /tmp/maas_nodes_read)
  INTERFACE_ID_1=$(jq -r ".[].interface_set[] | select(.mac_address==\"$MAC_1\").id" /tmp/maas_nodes_read)
  INTERFACE_ID_2=$(jq -r ".[].interface_set[] | select(.mac_address==\"$MAC_2\").id" /tmp/maas_nodes_read)
  INTERFACE_ID_3=$(jq -r ".[].interface_set[] | select(.mac_address==\"$MAC_3\").id" /tmp/maas_nodes_read)
  INTERFACE_ID_4=$(jq -r ".[].interface_set[] | select(.mac_address==\"$MAC_4\").id" /tmp/maas_nodes_read)
  INTERFACE_ID_5=$(jq -r ".[].interface_set[] | select(.mac_address==\"$MAC_5\").id" /tmp/maas_nodes_read)

  # Remove the "Auto assign" IP address and set static instead
  # https://askubuntu.com/questions/942412/how-do-you-statically-asign-an-ip-to-a-commissioned-machine-in-maas
  OLD_LINK_ID=$(jq ".[].interface_set[] | select(.id==$INTERFACE_ID_1).links[].id" /tmp/maas_nodes_read)
  maas admin interface unlink-subnet "$SYSTEM_ID" "$INTERFACE_ID_1" "id=$OLD_LINK_ID"
  maas admin interface link-subnet "$SYSTEM_ID" "$INTERFACE_ID_1" mode=STATIC "subnet=cidr:$SUBNET_CIDR_1" "ip_address=$IP_1" default_gateway=true

  # Create bond interfaces
  maas admin interfaces create-bond "$SYSTEM_ID" name=bond0 "parents=$INTERFACE_ID_2" "mac_address=$MAC_2" "parents=$INTERFACE_ID_3" bond_mode=active-backup
  maas admin interfaces create-bond "$SYSTEM_ID" name=bond1 "parents=$INTERFACE_ID_4" "mac_address=$MAC_4" "parents=$INTERFACE_ID_5" bond_mode=active-backup

  # Regenerate /tmp/maas_nodes_read - now with the bond interfaces
  maas admin nodes read "mac_address=$MAC_1" > /tmp/maas_nodes_read
  BOND0_ID=$(jq -r ".[].interface_set[] | select(.name==\"bond0\").id" /tmp/maas_nodes_read)
  BOND1_ID=$(jq -r ".[].interface_set[] | select(.name==\"bond1\").id" /tmp/maas_nodes_read)

  # Assign proper fabric and IP to the bond0
  FABRIC_VLAN_ID=$(maas admin subnets read | jq ".[] | select(.cidr==\"$SUBNET_CIDR_2\").vlan.id")
  maas admin interface update "$SYSTEM_ID" "$BOND0_ID" "vlan=$FABRIC_VLAN_ID"
  maas admin interface link-subnet "$SYSTEM_ID" "$BOND0_ID" mode=STATIC "subnet=cidr:$SUBNET_CIDR_2" "ip_address=$IP_2"

  # Assign proper fabric and IP to the bond1
  FABRIC_VLAN_ID=$(maas admin subnets read | jq ".[] | select(.cidr==\"$SUBNET_CIDR_3\").vlan.id")
  maas admin interface update "$SYSTEM_ID" "$BOND1_ID" "vlan=$FABRIC_VLAN_ID"
  maas admin interface link-subnet "$SYSTEM_ID" "$BOND1_ID" mode=STATIC "subnet=cidr:$SUBNET_CIDR_3" "ip_address=$IP_3"

  # Deploy server
  maas admin machine deploy "$SYSTEM_ID"
done

# All machines should be installed + deployed...
virsh -c qemu+tcp://192.168.25.1/system list --all

ssh ubuntu@192.168.25.12 -o StrictHostKeyChecking=no
ssh ubuntu@192.168.25.13 -o StrictHostKeyChecking=no
Asciinema if needed:

I hope it’s helpful for somebody…
Enjoy ;-)
This post is licensed under CC BY 4.0 by the author.