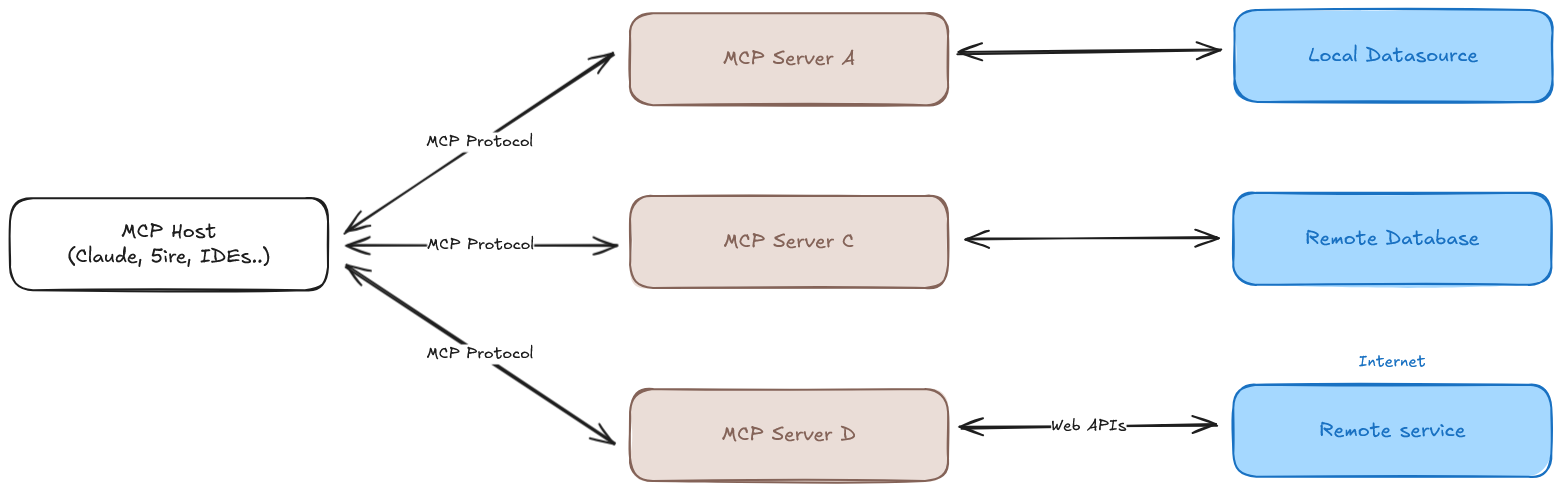
MCP Servers running on Kubernetes
Deploy MCP servers on Amazon EKS Auto Mode using ToolHive, vLLM, LibreChat, and Open WebUI for self-hosted AI chat
In the previous post, Build secure and cheap Amazon EKS Auto Mode I used cert-manager to obtain a wildcard certificate for the Ingress. This post will explore running various MCP servers in Kubernetes, aiming to power a web chat application like ChatGPT for data queries.
This post will guide you through the following steps:
- ToolHive Installation: Setting up ToolHive, a secure manager for MCP servers in Kubernetes.
- MCP Server Deployment: Deploying
mkpandosvMCP servers. - LibreChat Installation: Installing and configuring LibreChat, a self-hosted web chat application.
- vLLM Installation: Setting up vLLM, a high-throughput inference engine for Large Language Models.
- Open WebUI Installation: Setting up Open WebUI, a user-friendly interface for chat interactions.
By the end of this tutorial, you’ll have a fully functional chat application powered by MCP servers and local LLM inference running on your EKS cluster.
Requirements
- Amazon EKS Auto Mode cluster (described in Build secure and cheap Amazon EKS Auto Mode)
- AWS CLI
- eksctl
- Helm
- kubectl
You will need the following environment variables. Replace the placeholder values with your actual credentials:
Variables used in the following steps:
1
2
3
4
5
6
7
8
export AWS_REGION="${AWS_REGION:-us-east-1}"
export CLUSTER_FQDN="${CLUSTER_FQDN:-k01.k8s.mylabs.dev}"
export CLUSTER_NAME="${CLUSTER_FQDN%%.*}"
export MY_EMAIL="petr.ruzicka@gmail.com"
export TMP_DIR="${TMP_DIR:-${PWD}/tmp}"
export KUBECONFIG="${KUBECONFIG:-${TMP_DIR}/${CLUSTER_FQDN}/kubeconfig-${CLUSTER_NAME}.conf}"
export TAGS="${TAGS:-Owner=${MY_EMAIL},Environment=dev,Cluster=${CLUSTER_FQDN}}"
mkdir -pv "${TMP_DIR}/${CLUSTER_FQDN}"
Install ToolHive
ToolHive is an open-source, lightweight, and secure manager for MCP (Model Context Protocol) servers, designed to simplify the deployment and management of AI model servers in Kubernetes environments.

Install toolhive-operator-crds and toolhive-operator helm charts.
Install the toolhive-operator-crds and toolhive-operator Helm charts:
1
2
3
4
5
6
# renovate: datasource=github-tags depName=stacklok/toolhive extractVersion=^toolhive-operator-crds-(?<version>.*)$
TOOLHIVE_OPERATOR_CRDS_HELM_CHART_VERSION="0.0.13"
helm upgrade --install --version="${TOOLHIVE_OPERATOR_CRDS_HELM_CHART_VERSION}" toolhive-operator-crds oci://ghcr.io/stacklok/toolhive/toolhive-operator-crds
# renovate: datasource=github-tags depName=stacklok/toolhive extractVersion=^toolhive-operator-(?<version>.*)$
TOOLHIVE_OPERATOR_HELM_CHART_VERSION="0.2.1"
helm upgrade --install --version="${TOOLHIVE_OPERATOR_HELM_CHART_VERSION}" --namespace toolhive-system --create-namespace toolhive-operator oci://ghcr.io/stacklok/toolhive/toolhive-operator
Deploy MCP Servers
Create a secret with your GitHub token and deploy the mkp and osv MCP servers:
1
2
3
# renovate: datasource=github-tags depName=stacklok/toolhive
TOOLHIVE_VERSION="0.2.3"
kubectl apply -f "https://raw.githubusercontent.com/stacklok/toolhive/refs/tags/v${TOOLHIVE_VERSION}/examples/operator/mcp-servers/mcpserver_mkp.yaml"
Create the OSV MCP Servers:
1
2
3
4
5
6
7
8
9
10
11
12
13
14
15
16
17
18
19
20
21
tee "${TMP_DIR}/${CLUSTER_FQDN}/k8s-toolhive-mcpserver-osv.yml" << EOF | kubectl apply -f -
apiVersion: toolhive.stacklok.dev/v1alpha1
kind: MCPServer
metadata:
  name: osv
  namespace: toolhive-system
spec:
  image: ghcr.io/stackloklabs/osv-mcp/server
  transport: streamable-http
  port: 8080
  permissionProfile:
    type: builtin
    name: network
  resources:
    limits:
      cpu: 100m
      memory: 128Mi
    requests:
      cpu: 50m
      memory: 64Mi
EOF
Enabling Karpenter to Provision amd64 Node Pools
vLLM only works with Nvidia GPU and amd64-based CPU instances. To enable Karpenter to provision an amd64 node pool, create a new NodePool resource as shown below:
1
2
3
4
5
6
7
8
9
10
11
12
13
14
15
16
17
18
19
20
21
22
23
24
25
26
27
28
29
30
31
32
33
34
35
36
37
38
39
40
41
42
43
44
45
46
47
48
49
50
51
52
53
54
55
56
57
58
59
60
61
62
63
64
65
66
67
68
69
70
71
72
73
74
75
76
77
78
79
80
81
tee "${TMP_DIR}/${CLUSTER_FQDN}/k8s-karpenter-nodepool-amd64.yml" << EOF | kubectl apply -f -
apiVersion: eks.amazonaws.com/v1
kind: NodeClass
metadata:
  name: my-default-gpu
spec:
$(kubectl get nodeclasses default -o yaml | yq '.spec | pick(["role", "securityGroupSelectorTerms", "subnetSelectorTerms"])' | sed 's/\(.*\)/  \1/')
  ephemeralStorage:
    size: 40Gi
---
apiVersion: karpenter.sh/v1
kind: NodePool
metadata:
  name: my-default-amd64-gpu
spec:
  template:
    spec:
      nodeClassRef:
        group: eks.amazonaws.com
        kind: NodeClass
        name: my-default-gpu
      requirements:
        - key: karpenter.sh/capacity-type
          operator: In
          values: ["spot", "on-demand"]
        - key: topology.kubernetes.io/zone
          operator: In
          values: ["${AWS_REGION}a"]
        - key: kubernetes.io/arch
          operator: In
          values: ["amd64"]
        - key: node.kubernetes.io/instance-type
          operator: In
          # g6.xlarge: NVIDIA L4 GPU, 4 vCPUs, 16 GiB RAM, x86_64 architecture
          values: ["g6.xlarge"]
      taints:
        - key: nvidia.com/gpu
          value: "true"
          effect: NoSchedule
  limits:
    cpu: 16
    memory: 64Gi
    nvidia.com/gpu: 4
---
apiVersion: eks.amazonaws.com/v1
kind: NodeClass
metadata:
  name: my-default-amd64
spec:
$(kubectl get nodeclasses default -o yaml | yq '.spec | pick(["role", "securityGroupSelectorTerms", "subnetSelectorTerms"])' | sed 's/\(.*\)/  \1/')
  ephemeralStorage:
    size: 40Gi
---
apiVersion: karpenter.sh/v1
kind: NodePool
metadata:
  name: my-default-amd64
spec:
  template:
    spec:
      nodeClassRef:
        group: eks.amazonaws.com
        kind: NodeClass
        name: my-default-amd64
      requirements:
        - key: eks.amazonaws.com/instance-category
          operator: In
          values: ["t"]
        - key: karpenter.sh/capacity-type
          operator: In
          values: ["spot", "on-demand"]
        - key: topology.kubernetes.io/zone
          operator: In
          values: ["${AWS_REGION}a"]
        - key: kubernetes.io/arch
          operator: In
          values: ["amd64"]
  limits:
    cpu: 8
    memory: 32Gi
EOF
Install vLLM
vLLM is a high-throughput and memory-efficient inference engine for Large Language Models (LLMs). It provides fast and scalable LLM serving with features like continuous batching, PagedAttention, and support for various model architectures.
![]()
Set up PersistentVolume (PV) and PersistentVolumeClaim (PVC) to store vLLM chat templates:
1
2
3
4
5
6
7
8
9
10
11
12
13
14
15
16
17
18
19
20
21
22
23
24
25
26
27
28
29
30
31
32
33
34
35
kubectl create namespace vllm
tee "${TMP_DIR}/${CLUSTER_FQDN}/k8s-vllm-vllm-chat-templates.yml" << EOF | kubectl apply -f -
apiVersion: v1
kind: PersistentVolumeClaim
metadata:
  name: vllm-templates-pvc
  namespace: vllm
spec:
  accessModes:
    - ReadWriteOnce
  resources:
    requests:
      storage: 1Gi
---
apiVersion: v1
kind: Pod
metadata:
  name: vllm-templates-downloader
  namespace: vllm
spec:
  containers:
  - name: vllm-templates-downloader
    image: busybox:latest
    command: ["wget", "-P", "/data/", "https://raw.githubusercontent.com/vllm-project/vllm/66785cc05c05c7f19f319533c23d1998b9d80bf9/examples/template_chatml.jinja"]
    volumeMounts:
      - mountPath: /data
        name: vllm-templates
  volumes:
    - name: vllm-templates
      persistentVolumeClaim:
        claimName: vllm-templates-pvc
  restartPolicy: Never
EOF
kubectl wait --for=jsonpath='{.status.phase}'=Succeeded pod/vllm-templates-downloader -n vllm
kubectl delete pod vllm-templates-downloader -n vllm
Install vllm helm chart and modify the default values.
1
2
3
4
5
6
7
8
9
10
11
12
13
14
15
16
17
18
19
20
21
22
23
24
25
26
27
28
29
30
31
32
33
34
35
36
37
38
39
40
41
42
43
44
45
46
47
48
49
50
51
52
53
54
55
56
57
58
59
60
61
62
63
64
65
66
67
68
69
70
71
72
73
74
75
76
77
78
79
80
81
82
83
84
85
86
# renovate: datasource=helm depName=vllm registryUrl=https://vllm-project.github.io/production-stack
VLLM_HELM_CHART_VERSION="0.1.5"

helm repo add vllm https://vllm-project.github.io/production-stack
cat > "${TMP_DIR}/${CLUSTER_FQDN}/helm_values-vllm.yml" << EOF
servingEngineSpec:
  runtimeClassName: ""
  modelSpec:
    # https://huggingface.co/TinyLlama/TinyLlama-1.1B-Chat-v1.0/resolve/main/config.json (license: apache-2.0)
    - name: tinyllama-1-1b-chat-v1-0
      annotations:
        model: tinyllama-1-1b-chat-v1-0
      podAnnotations:
        model: tinyllama-1-1b-chat-v1-0
      repository: vllm/vllm-openai
      tag: latest
      modelURL: TinyLlama/TinyLlama-1.1B-Chat-v1.0
      replicaCount: 1
      requestCPU: 2
      requestMemory: 8Gi
      requestGPU: 0
      limitCPU: 8
      limitMemory: 32Gi
      nodeSelectorTerms:
        - matchExpressions:
            - key: kubernetes.io/arch
              operator: In
              values: ["amd64"]
      pvcStorage: 5Gi
    # https://huggingface.co/microsoft/phi-2/resolve/main/config.json (license: apache-2.0)
    - name: phi-2
      annotations:
        model: phi-2
      podAnnotations:
        model: phi-2
      repository: vllm/vllm-openai
      tag: latest
      modelURL: microsoft/phi-2
      replicaCount: 1
      requestCPU: 2
      requestMemory: 8Gi
      requestGPU: 1
      limitCPU: 8
      limitMemory: 32Gi
      chatTemplate: "/templates/template_chatml.jinja"
      nodeSelectorTerms:
        - matchExpressions:
            - key: kubernetes.io/arch
              operator: In
              values: ["amd64"]
      pvcStorage: 20Gi
    - name: granite-3-1-3b-a800m-instruct
      annotations:
        model: granite-3-1-3b-a800m-instruct
      podAnnotations:
        model: granite-3-1-3b-a800m-instruct
      repository: vllm/vllm-openai
      tag: latest
      modelURL: ibm-granite/granite-3.1-3b-a800m-instruct
      replicaCount: 1
      requestCPU: 2
      requestMemory: 8Gi
      requestGPU: 1
      limitCPU: 8
      limitMemory: 32Gi
      nodeSelectorTerms:
        - matchExpressions:
            - key: kubernetes.io/arch
              operator: In
              values: ["amd64"]
      pvcStorage: 20Gi
routerSpec:
  resources:
    requests:
      cpu: 1
      memory: 2Gi
    limits:
      cpu: 2
      memory: 4Gi
  nodeSelectorTerms:
    - matchExpressions:
        - key: kubernetes.io/arch
          operator: In
          values: ["amd64"]
EOF
helm upgrade --install --version "${VLLM_HELM_CHART_VERSION}" --namespace vllm --values "${TMP_DIR}/${CLUSTER_FQDN}/helm_values-vllm.yml" vllm vllm/vllm-stack
Install LibreChat
LibreChat is an open-source, self-hosted web chat application designed as an enhanced alternative to ChatGPT. It supports multiple AI providers (including OpenAI, Azure, Google, and more), offers a user-friendly interface, conversation management, plugin support, and advanced features like prompt templates and file uploads.
![]()
Create librechat namespace and secrets with environment variables:
1
2
3
4
5
6
7
8
9
kubectl create namespace librechat
(
  set +x
  kubectl create secret generic --namespace librechat librechat-credentials-env \
    --from-literal=CREDS_KEY="$(openssl rand -hex 32)" \
    --from-literal=CREDS_IV="$(openssl rand -hex 16)" \
    --from-literal=JWT_SECRET="$(openssl rand -hex 32)" \
    --from-literal=JWT_REFRESH_SECRET="$(openssl rand -hex 32)"
)
Install librechat helm chart and modify the default values.
1
2
3
4
5
6
7
8
9
10
11
12
13
14
15
16
17
18
19
20
21
22
23
24
25
26
27
28
29
30
31
32
33
34
35
36
37
38
39
40
41
42
43
44
45
46
47
48
49
50
51
52
53
54
55
56
57
58
59
60
# renovate: datasource=helm depName=librechat registryUrl=https://charts.blue-atlas.de
LIBRECHAT_HELM_CHART_VERSION="1.8.10"

helm repo add librechat https://charts.blue-atlas.de
cat > "${TMP_DIR}/${CLUSTER_FQDN}/helm_values-librechat.yml" << EOF
librechat:
  # https://www.librechat.ai/docs/configuration/dotenv
  configEnv:
    ALLOW_EMAIL_LOGIN: "true"
    ALLOW_REGISTRATION: "true"
    ENDPOINTS: agents,custom
    existingSecretName: librechat-credentials-env
  # https://github.com/danny-avila/LibreChat/blob/main/librechat.example.yaml
  configYamlContent: |
    version: 1.2.1
    cache: true
    endpoints:
      custom:
        - name: vLLM
          apiKey: vllm
          baseURL: http://vllm-router-service.vllm.svc.cluster.local/v1
          models:
            default: ['TinyLlama/TinyLlama-1.1B-Chat-v1.0']
            fetch: true
    mcpServers:
      mkp:
        type: sse
        url: http://mcp-mkp-proxy.toolhive-system.svc.cluster.local:8080/sse
      osv:
        type: sse
        url: http://mcp-osv-proxy.toolhive-system.svc.cluster.local:8080/sse
  imageVolume:
    enabled: false
image:
  tag: "v0.8.0-rc1"
ingress:
  annotations:
    gethomepage.dev/enabled: "true"
    gethomepage.dev/description: LibreChat is an open-source, self-hosted web chat application designed as an enhanced alternative to ChatGPT
    gethomepage.dev/group: Apps
    gethomepage.dev/icon: https://raw.githubusercontent.com/danny-avila/LibreChat/8f20fb28e549949b05e8b164d8a504bc14c0951a/client/public/assets/logo.svg
    gethomepage.dev/name: LibreChat
    nginx.ingress.kubernetes.io/auth-url: https://oauth2-proxy.${CLUSTER_FQDN}/oauth2/auth
    nginx.ingress.kubernetes.io/auth-signin: https://oauth2-proxy.${CLUSTER_FQDN}/oauth2/start?rd=\$scheme://\$host\$request_uri
  hosts:
    - host: librechat.${CLUSTER_FQDN}
      paths:
        - path: /
          pathType: ImplementationSpecific
  tls:
    - hosts:
        - librechat.${CLUSTER_FQDN}
# https://github.com/bitnami/charts/blob/main/bitnami/mongodb/values.yaml
mongodb:
  nodeSelector:
    kubernetes.io/arch: amd64
meilisearch:
  enabled: false
EOF
helm upgrade --install --version "${LIBRECHAT_HELM_CHART_VERSION}" --namespace librechat --values "${TMP_DIR}/${CLUSTER_FQDN}/helm_values-librechat.yml" librechat librechat/librechat
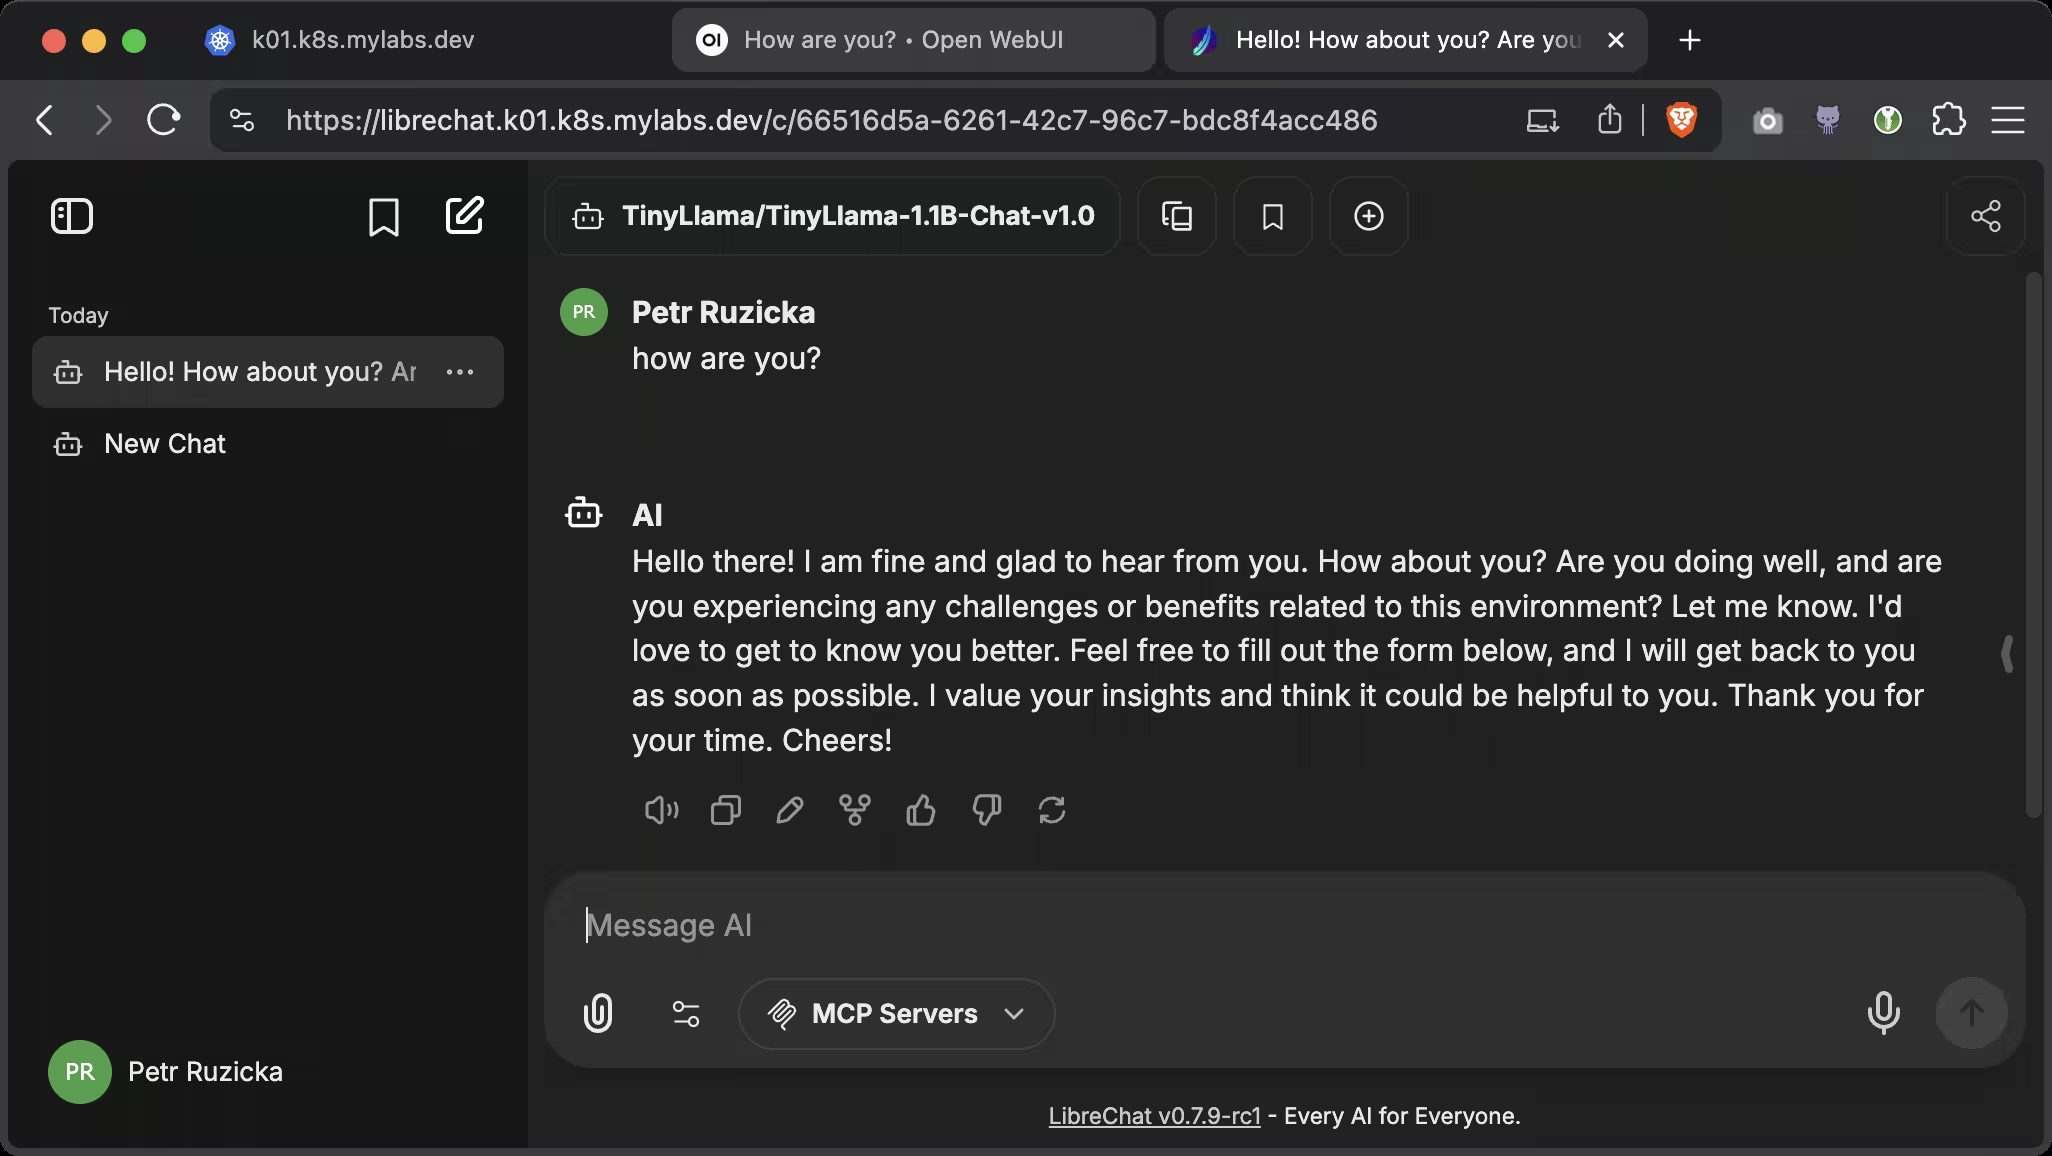 LibreChat
Install Open WebUI
Open WebUI is a user-friendly web interface for chat interactions.
![]()
Install open-webui helm chart and modify the default values.
1
2
3
4
5
6
7
8
9
10
11
12
13
14
15
16
17
18
19
20
21
22
23
24
25
26
27
28
29
30
31
32
33
34
35
36
37
38
39
# renovate: datasource=helm depName=open-webui registryUrl=https://helm.openwebui.com
OPEN_WEBUI_HELM_CHART_VERSION="7.0.1"

helm repo add open-webui https://helm.openwebui.com/
cat > "${TMP_DIR}/${CLUSTER_FQDN}/helm_values-open-webui.yml" << EOF
ollama:
  enabled: false
pipelines:
  enabled: false
ingress:
  enabled: true
  annotations:
    gethomepage.dev/enabled: "true"
    gethomepage.dev/description: Open WebUI is a user friendly web interface for chat interactions.
    gethomepage.dev/group: Apps
    gethomepage.dev/icon: https://raw.githubusercontent.com/open-webui/open-webui/14a6c1f4963892c163821765efcc10c5c4578454/static/static/favicon.svg
    gethomepage.dev/name: Open WebUI
    nginx.ingress.kubernetes.io/auth-url: https://oauth2-proxy.${CLUSTER_FQDN}/oauth2/auth
    nginx.ingress.kubernetes.io/auth-signin: https://oauth2-proxy.${CLUSTER_FQDN}/oauth2/start?rd=\$scheme://\$host\$request_uri
  host: open-webui.${CLUSTER_FQDN}
persistence:
  size: 3Gi
extraEnvVars:
  - name: ADMIN_EMAIL
    value: ${MY_EMAIL}
  - name: ENV
    value: dev
  - name: WEBUI_URL
    value: https://open-webui.${CLUSTER_FQDN}
  - name: OPENAI_API_BASE_URL
    value: http://vllm-router-service.vllm.svc.cluster.local/v1
  - name: DEFAULT_MODELS
    value: TinyLlama/TinyLlama-1.1B-Chat-v1.0
  - name: ENABLE_EVALUATION_ARENA_MODELS
    value: "False"
  - name: ENABLE_CODE_INTERPRETER
    value: "False"
EOF
helm upgrade --install --version "${OPEN_WEBUI_HELM_CHART_VERSION}" --namespace open-webui --create-namespace --values "${TMP_DIR}/${CLUSTER_FQDN}/helm_values-open-webui.yml" open-webui open-webui/open-webui
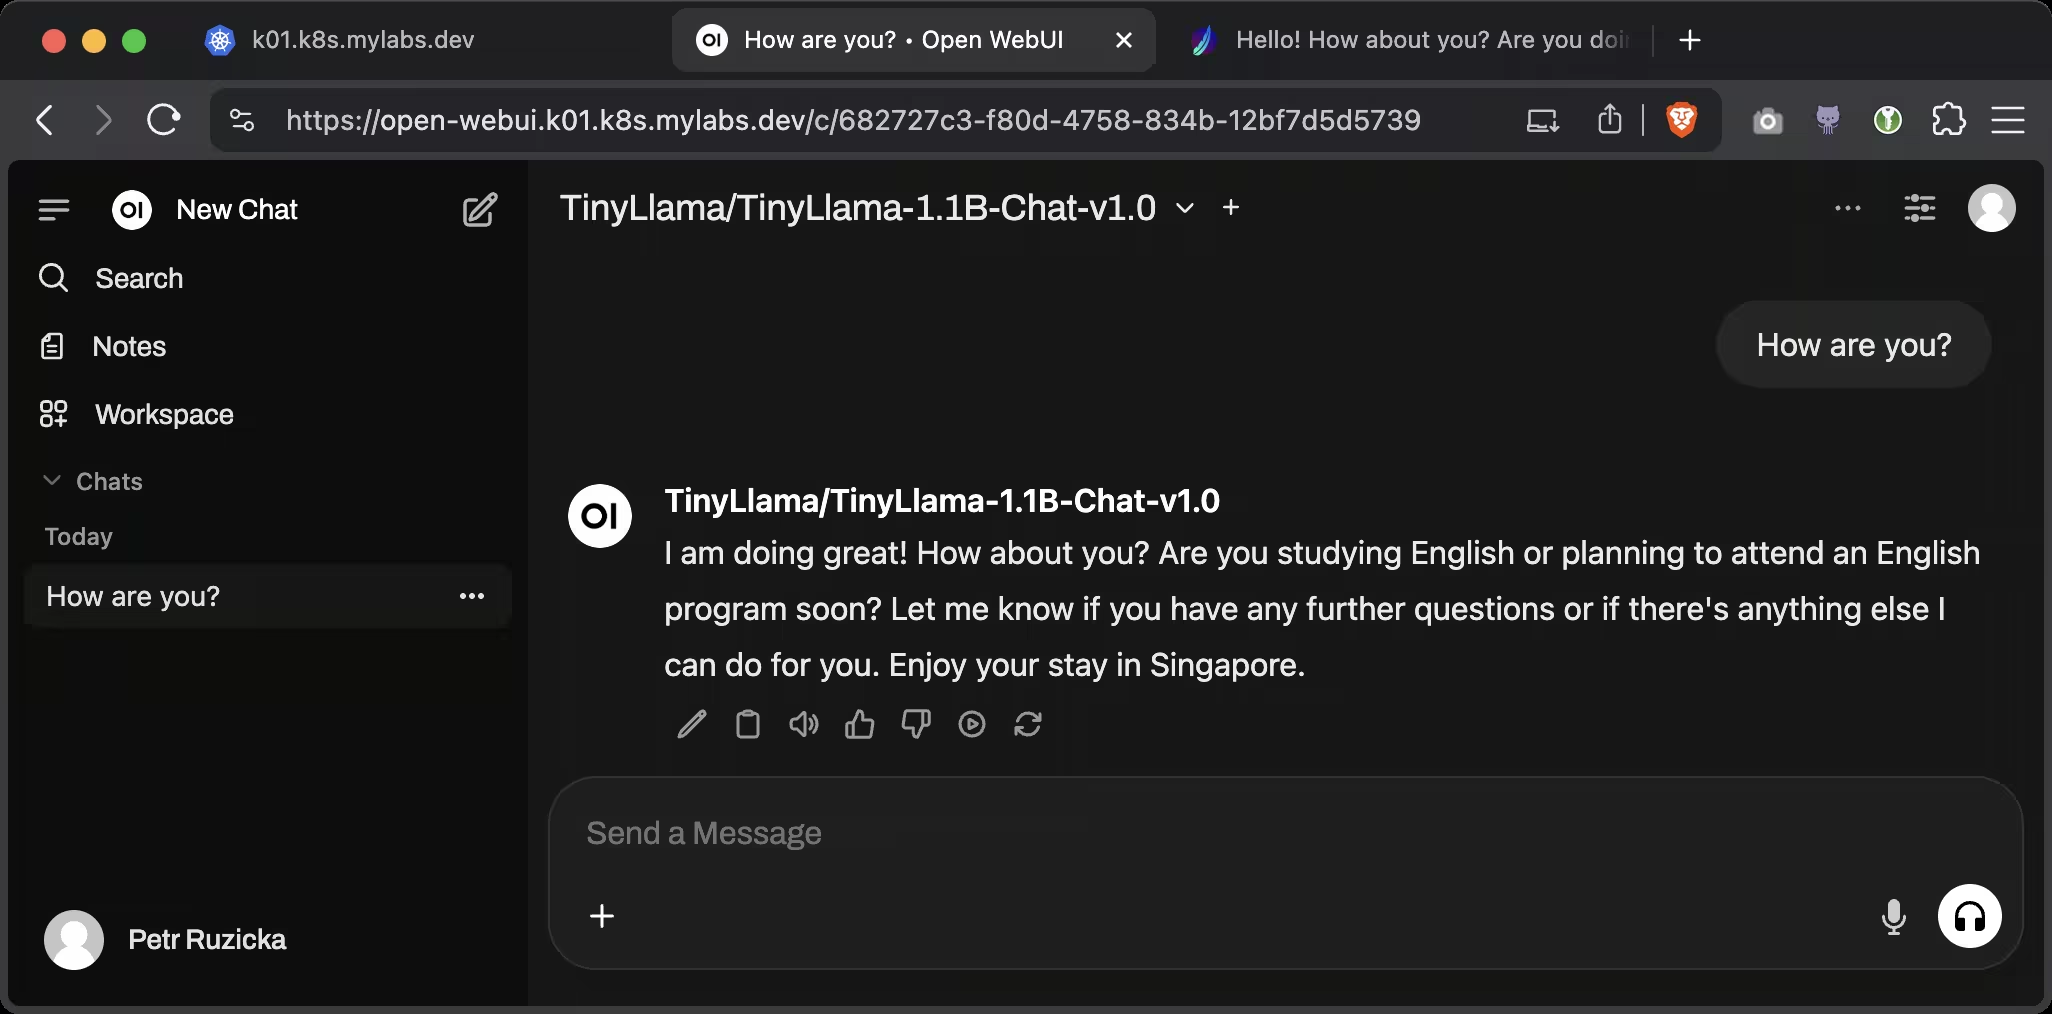 Open WebUI
Clean-up

Remove files from the ${TMP_DIR}/${CLUSTER_FQDN} directory:
1
2
3
4
5
6
7
for FILE in "${TMP_DIR}/${CLUSTER_FQDN}"/{k8s-toolhive-mcpserver-osv,k8s-karpenter-nodepool-amd64,k8s-vllm-vllm-chat-templates,helm_values-{vllm,librechat,open-webui}}.yml; do
  if [[ -f "${FILE}" ]]; then
    rm -v "${FILE}"
  else
    echo "*** File not found: ${FILE}"
  fi
done
Enjoy … 😉